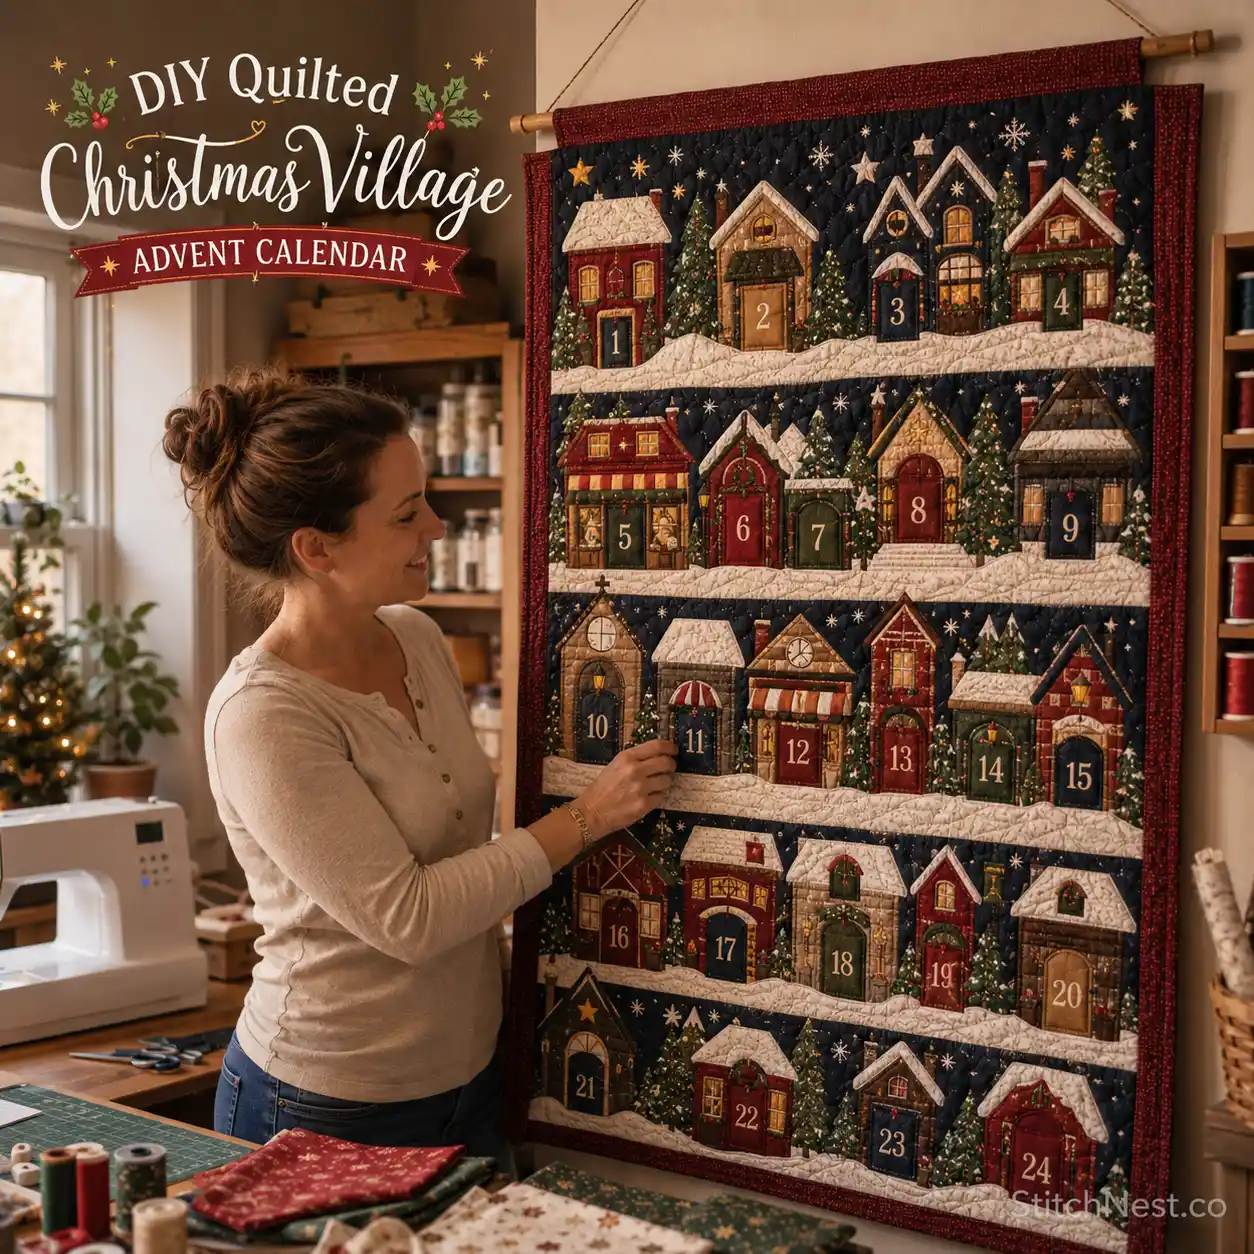
A fabric advent calendar is already a lovely Christmas tradition, but you can make yours much more personal by turning it into a little quilted village. Instead of sewing 24 identical pockets onto a plain background, you will build a row of tiny houses, shops, trees, snowy roofs, and other details that make the calendar feel like a small Christmas scene. For this tutorial, we are going to make a quilted wall-hanging DIY Quilted Christmas Village Advent Calendar with 24 individual pockets.
Quick Checklist of Things You’ll Need
- Rotary cutter with a self-healing cutting mat
- High-quality cotton fabric bundles
- Acrylic quilting rulers for precise shapes
- Sewing machine with quilting foot attachment
- Soft batting for a cozy finished feel
- 2 to 4 pairs of old denim jeans
- Cotton backing fabric
- Quilting ruler
- Neutral thread
- Pins or clips
- Iron for pressing seams
What Makes This Advent Calendar Different?
Most fabric Advent calendars use a flat rectangle with rows of pockets. That construction works perfectly well, but it does not give you much room to tell a visual story.
In ours, the pockets become part of the scene. A house can have a numbered door, a shop can have a tiny window, and a row of trees can separate one group of pockets from another. You are not simply attaching pockets to a quilt; you are building the pockets into the design.
The finished piece can also be made in sections. That means you do not need to quilt a huge, complicated wall hanging in one go. You can piece the background, prepare the village, make the pockets, and assemble everything in manageable stages.
If you have never made a quilted wall hanging before, it is useful to see how smaller quilt projects handle borders, hanging structures, and finishing. Mini quilt wall hangings for home décor are a good place to look before deciding how large you want your Advent calendar to be.
You can also use this project to use up Christmas scraps. A few fat quarters can provide roofs, doors, windows, trees, and pocket fronts, so you do not need a large amount of every fabric.
You’ll Definitely Need These
For a calendar around 24 to 30 inches wide and 30 to 36 inches tall, you will need a main fabric for the background, several small pieces of quilting cotton for the village, fabric for the pocket fronts, batting, backing fabric, binding fabric, and a small amount of fabric or felt for numbers.
The exact amount depends on the size of your village. We recommend deciding on the finished dimensions before shopping because a wider calendar gives you more room for larger pockets and more detailed buildings. You can also check out our free quilt fabric calculator tool for help!
You will also need a sewing machine, fabric scissors, rotary cutter, cutting mat, acrylic ruler, fabric clips or pins, an iron, pressing surface, washable fabric marker, thread, and a dowel or wooden rod for hanging.
A Creative Grids quilting ruler is useful for cutting the straight sections of the background and keeping pocket pieces consistent. An OLFA rotary cutter is another useful tool if you are cutting multiple fabric pieces.
You do not need special Christmas fabric for every part of the calendar. In fact, a mixture of solids, small prints, stripes, checks, and leftover scraps can make the village look more interesting.
If you already have precut strips, jelly roll quilt patterns will give you ideas for using coordinated strips in the background or borders.
DIY Quilted Christmas Village Advent Calendar
Step 1: Plan Your Christmas Village
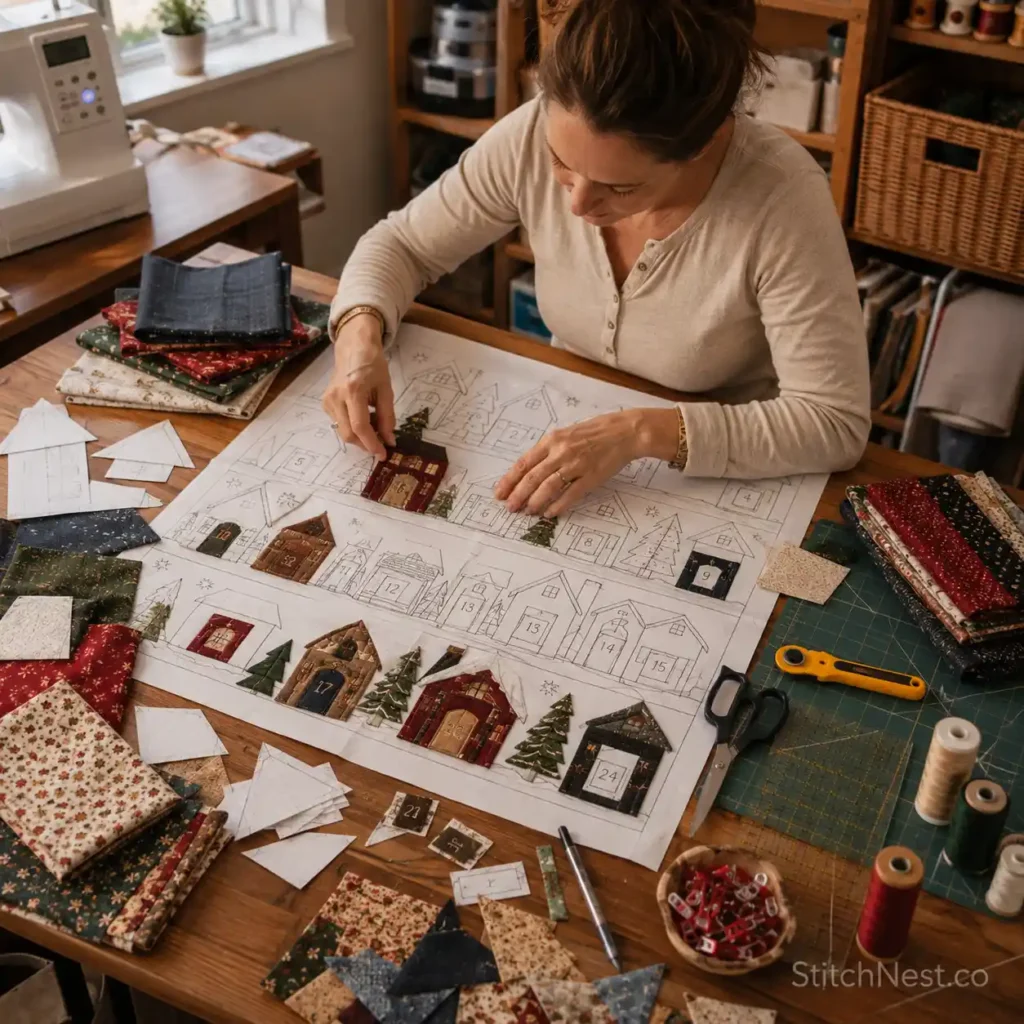
Before cutting anything, decide how large your finished Advent calendar will be. Then divide the front into three basic areas: the sky or background, the village, and the lower section where the pockets will sit.
As we said, a useful starting point is a calendar around 24 inches wide by 30 inches tall. You can make it larger, but remember that every extra inch adds weight once the batting, backing, and 24 filled pockets are attached.
Sketch your village on paper first. You do not need an artistic drawing. Simple rectangles with triangular roofs are enough. Mark where the houses will sit, where the trees will go, and where you want the 24 numbered pockets.
Think about the pocket arrangement before you make the buildings. You might have six houses with four pockets each, four larger buildings with six pockets each, or a mixture of house-shaped pockets and small rectangular pockets.
The numbers do not have to run from left to right in perfect order. In fact, spreading them around the village makes the calendar more interactive. You can put Day 1 on one house and Day 2 several inches away so the child has to find the correct pocket each morning.
For a little more structure, quilt blocks can become the background behind your village. Hidden Wells quilt blocks can be simplified into larger sections, especially if you want the sky or snowy ground to have some patchwork movement.
Keep the background relatively calm. The village needs to be the main focus, and 24 pockets already create plenty of visual information.
Step 2: Choose the Village Palette
This is where you can decide whether your calendar feels traditional, rustic, modern, or playful.
A traditional Christmas village could use deep red, forest green, cream, warm brown, and hints of gold. A Scandinavian-inspired version might use cream, charcoal, muted red, and natural linen. You could also make a darker nighttime village using navy, charcoal, deep green, and warm yellow windows.
We recommend choosing three or four main colors and then allowing a few smaller accents. If every house is a completely different color, the village can start to feel disconnected.
Use fabric value to separate the buildings from the background. A dark roof against a medium-blue sky is easy to read. A cream house against a white background is much harder to see unless you add a darker outline or border.
You can also create texture through fabric choice. A small plaid roof, striped awning, solid door, tiny floral curtain, or textured fabric tree can make a building interesting without requiring complicated sewing.
If you enjoy working with small scraps, Potato Chip quilt pattern ideas are great for combining many different fabrics without needing a strict block layout.
Do not worry about using fabric from the same collection. Scraps from older projects can work beautifully here. The important thing is to repeat a few colors across the village, so the separate pieces feel connected.
Step 3: Build the Quilted Background
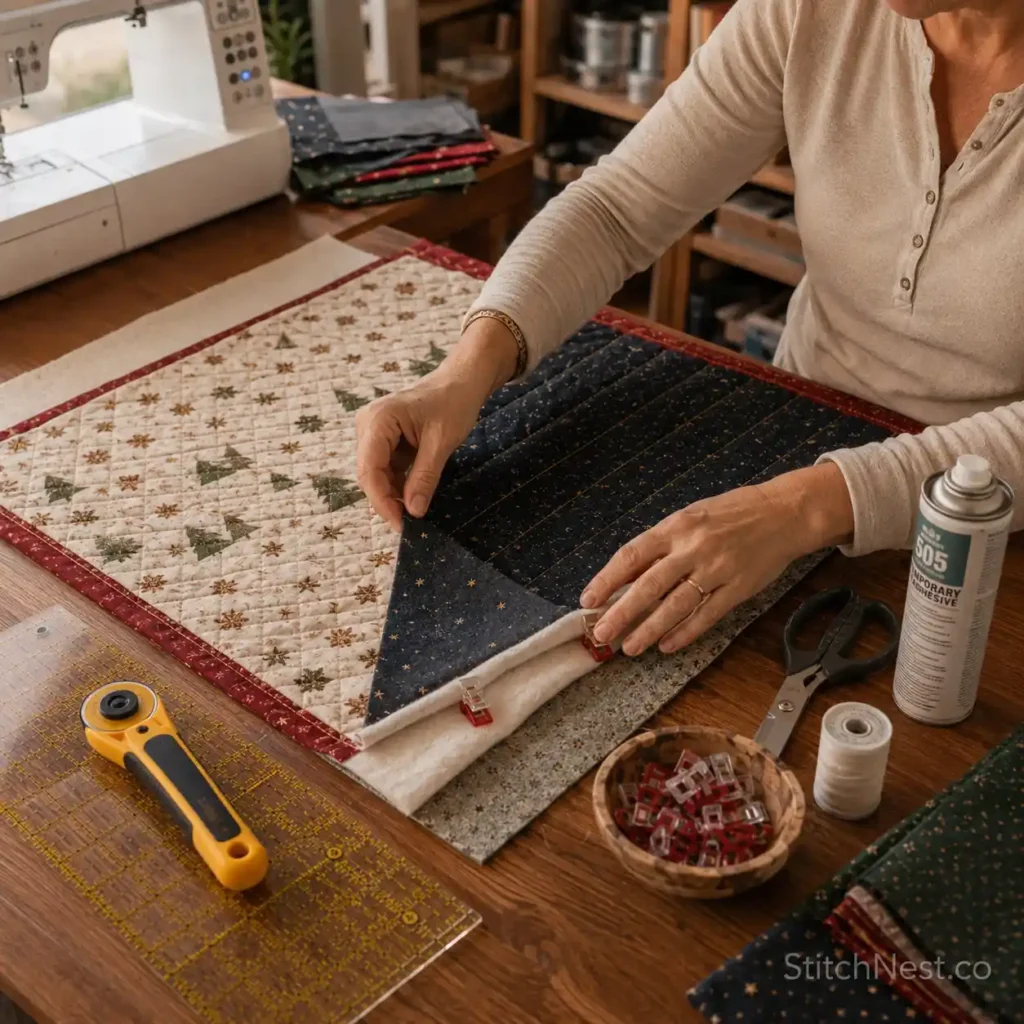
Start with the background because it gives you a stable surface for everything else. Cut your background fabric to the finished size you want, adding a little extra around the edges if you plan to trim the quilt sandwich after quilting.
Lay the background fabric over your batting and backing. You can baste the layers with pins, clips, hand basting, or a temporary spray adhesive.
If you use spray adhesive, Odif 505 spray adhesive is one option commonly used for temporarily holding quilting layers together. Use it according to the manufacturer’s directions and work in a suitable ventilated area.
You do not need dense quilting for an Advent calendar. The calendar will already have pockets and appliqué adding weight, so simple quilting is often enough.
Straight vertical or horizontal lines work well. You can also quilt gentle diagonal lines to create a snowy or starry background.
If you want to add quilting motifs, quilting design stencils will help you mark repeated shapes before stitching.
Leave the edges unfinished until the village and pockets are attached. It is much easier to trim and square the entire piece at the end than to bind the background first and then sew through the finished binding.
Step 4: Make the Houses and Buildings
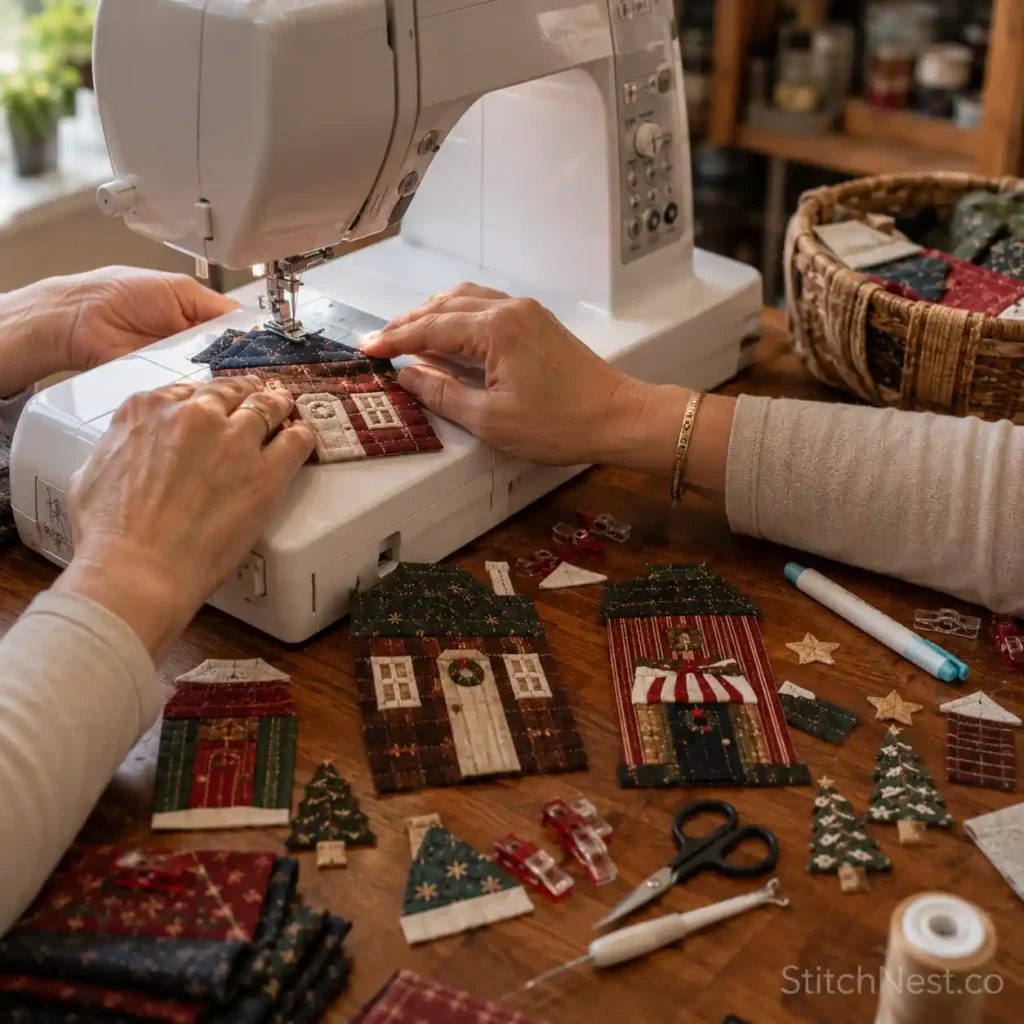
Now we get to the part that makes this Advent calendar feel like a village.
The easiest houses are made from rectangles with triangular roofs. Cut one rectangle for the main building, one rectangle or triangle for the roof, and smaller pieces for the door and windows.
You can make every house slightly different. One can be tall and narrow, another wide and low, another can have a chimney, and another can have an awning. Just don’t make the buildings too small. Tiny pieces can look wonderful in a quilt, but 24 pockets already require plenty of sewing. If the houses are also made from six or seven tiny pieces each, the project can become much more time-consuming than necessary.
A good approach is to make the building shape simple and let the details do the work. A plain red rectangle becomes a shop once you add a cream door, two windows, and a dark roof.
You can use appliqué for the smaller details instead of piecing them. This is particularly useful for windows, snow, wreaths, stars, and little trees.
If you want to practice with simple appliqué shapes before starting the village, ghost appliqué patterns will help you understand how simple silhouettes can be cut and secured onto a quilted background.
You can also use small animal motifs. A tiny dog sitting outside one house or a cat in a window can make the village feel lived in. These cute animal quilted pattern DIYs have ideas that can be scaled down for these little details.
Step 5: Add Snow, Trees, and Tiny Details
Once the buildings are ready, lay them across the background without sewing them down yet. This is your chance to move things around. Step back from the table and look at the village as a whole. You want a mixture of tall and short buildings, open spaces, trees, and small decorative areas.
Snow is particularly easy to add. You can use white cotton, cream fabric, felt, or even a lightly textured fabric for snow-covered roofs.
For a softer look, cut the snow pieces with gentle curves instead of perfect straight lines. Small uneven edges can make the scene feel handmade rather than geometric.
Trees can be simple triangles. You can make them from two or three shades of green, add brown trunks, or use a darker green fabric with tiny stitched details.
If you want the village to have a little more vibe, add stars, snowflakes, wreaths, smoke from chimneys, tiny fences, lamp posts, or a moon.
You can also borrow layout ideas from other quilt styles. Here are walkabout quilt pattern ideas to help you think about how the eye moves across a quilt rather than focusing on one central block.
At this point, do not attach everything permanently. Take a photograph of the arrangement first. If you are happy with it, you have a reference to use as you work.
Step 6: Turn the Village Into an Advent Calendar
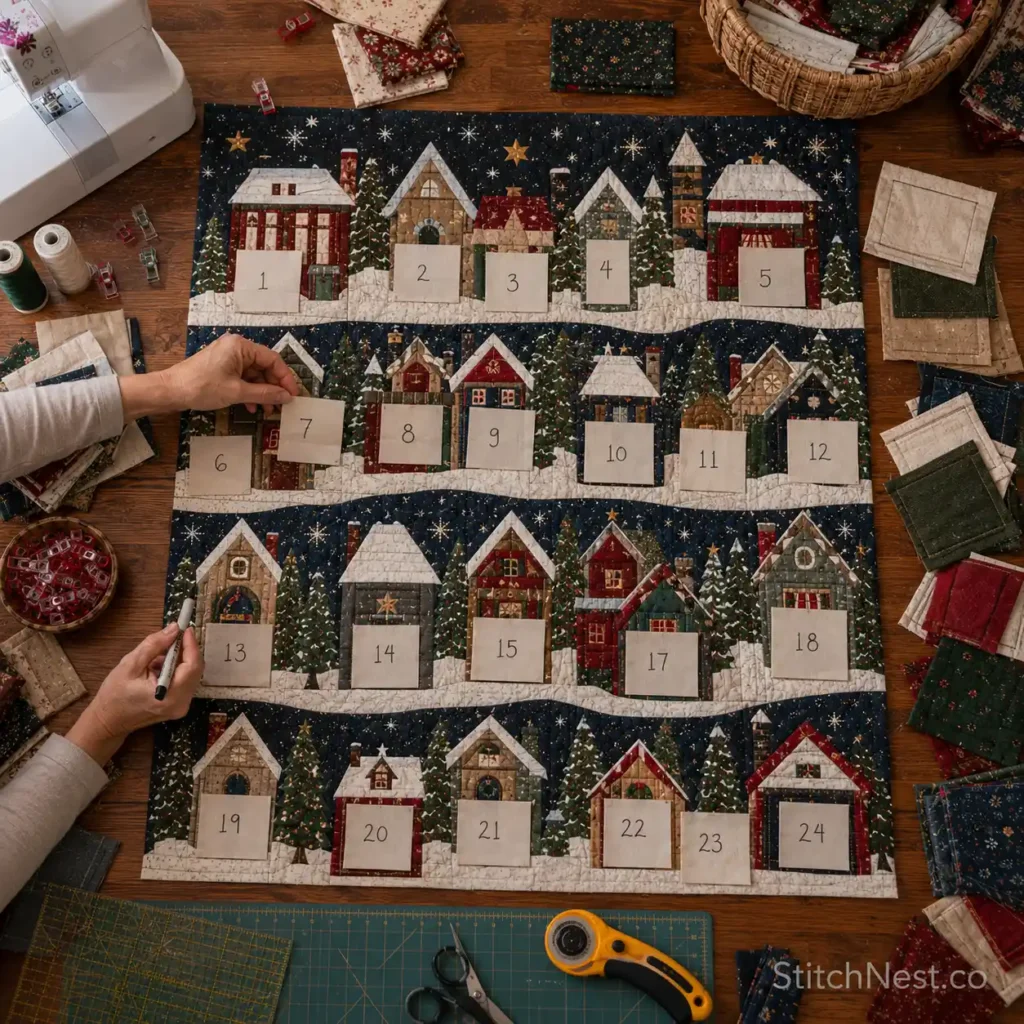
Now we need to make the 24 pockets. You have two main choices. You can make simple flat pockets, or you can make slightly expandable pockets with a fold or pleat. For an Advent calendar that will hold small toys, candy, folded notes, or several small items, we recommend giving the pockets a little extra room.
A flat pocket is easier. Cut a rectangle, finish the top edge, fold the other edges under, and sew three sides onto the calendar.
For a roomier pocket, create a small side or bottom pleat. This gives the pocket additional depth without making it much larger.
Sturdy pocket construction matters because Advent calendars are handled repeatedly. Tutorials for reusable fabric calendars often use doubled pocket fabric or reinforcement to help the pockets survive years of filling and emptying.
Before attaching the pockets, make a paper mock-up. Place 24 paper rectangles across the village and number them 1 through 24. This lets you see whether the pockets are too close together or whether some buildings are being hidden.
You can make each pocket a different fabric, but keep the palette connected to the village. A red pocket on a cream house can look like a door. A green pocket can become part of a tree. A striped pocket can become an awning.
If you want to make the calendar especially sturdy, add a second fabric layer to the pocket fronts. You can also use a lightweight interfacing if your fabric is very thin.
Step 7: Add the Numbers
The numbers are small, but they are one of the most important design details because they turn the village into an actual Advent calendar.
You can appliqué numbers from fabric, cut them from felt, embroider them, use heat-transfer material, or sew purchased fabric numbers onto the pockets.
Small felt numbers are particularly easy. They do not require a finished edge, and you can attach them with a simple running stitch or blanket stitch. If you want the numbers to blend into the village, use one color throughout. If you want them to stand out, alternate two colors.
Avoid making the numbers too small. They need to be easy to identify, particularly if children will be searching for the correct day.
You can also make the numbering part of the story. A large “1” could sit on the door of the first house, “2” could appear on a shop window, and later numbers could be scattered among trees and rooftops.
This kind of small appliqué work is similar to what you might do on a quilted accessory. And if you want to make one, we suggest you start with these quilted lunch bag patterns.
If you are making the calendar for children, keep the numbers securely attached. Avoid loose decorative pieces that could detach easily.
Step 8: Attach the Village and Pockets
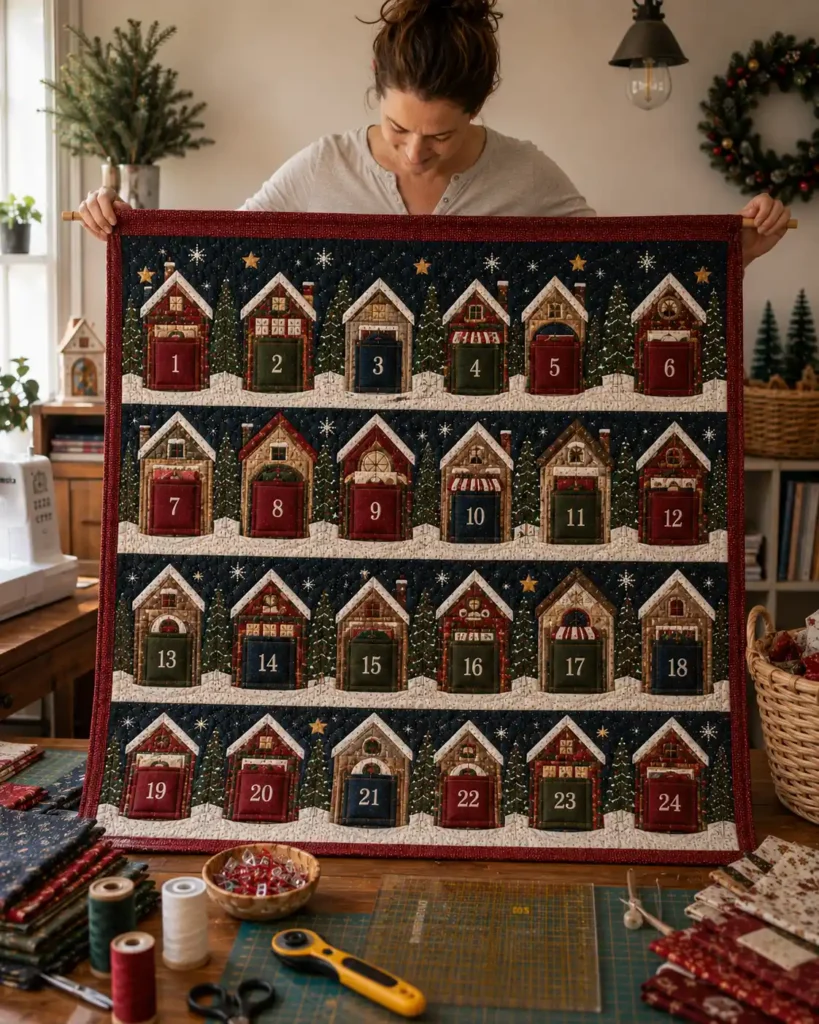
Once the background is quilted and the layout is confirmed, attach the village pieces. For appliqué pieces, use temporary adhesive, pins, or fabric clips to keep everything in place. Then stitch around the edges.
A narrow zigzag, satin stitch, blanket stitch, or simple straight stitch can work. Your choice depends on the look you want.
Straight stitching gives a clean, slightly rustic finish. Blanket stitching gives a more traditional handmade appliqué look. A dense satin stitch gives the edges a stronger outline.
If you are using lightweight fabric over a quilted background, a small amount of stabilizer behind the appliqué can prevent puckering.
Attach the larger village pieces first, then add the smaller details. This keeps the work organized and makes it easier to see where additional decoration is needed.
Next, place the 24 pockets according to your paper mock-up. Make sure the pocket opening is facing upward and that the top edge is finished before you sew the pocket to the calendar.
Sew the sides and bottom securely. Backstitch at the beginning and end, particularly at the upper corners where the pocket can receive more pulling.
For a more structured quilted project, quilted car trash basket patterns are one you should try. It’ll also help you with reinforcing fabric pieces that need to hold their shape and withstand repeated use.
Step 9: Add the Final Quilting Details
Once the main appliqué and pockets are attached, look at the calendar again. You may notice that some areas need more quilting to connect the design. This is a good time to add small stitched stars, snowflakes, roof lines, window frames, or swirls of wind.
Do not quilt directly through a pocket if you need the pocket to remain open. Mark the pocket boundaries first and keep decorative stitching outside those areas.
You can also use quilting to create visual separation between sections of the village. A few horizontal lines beneath the houses can suggest snow-covered ground. Gentle curves can create hills.
If you are using several different fabrics, quilting can help unify them because the same thread color travels across each section.
For inspiration, French Roses quilt pattern ideas will give you ideas for using repeated floral or curved motifs. You do not need to copy the block; simply look at how repeated shapes create movement across a larger quilt.
The same principle applies to seasonal motifs. 4th of July quilt ideas are super useful for studying how stars and repeated small motifs can be distributed across a quilt. The colors and theme are different, but the layout principle works perfectly well here.
Step 10: Add the Backing and Binding
Now that the front is complete, it is time to finish the calendar like a small quilt.
Trim the quilted front, batting, and backing so all three layers are even. Check the corners carefully and square the edges as much as possible.
Add your backing fabric and secure the layers. If you have already quilted the background and attached the village afterward, you may only need enough stitching to secure the backing and reinforce the overall structure.
If you prefer to quilt the entire calendar after adding the village and pockets, be careful around the pockets. You do not want to accidentally close an opening or stitch through a pocket.
Binding is the cleanest way to finish the outer edge. Cut your binding strips, join them, press them, and attach them around the perimeter.
Because the calendar will be hung vertically, the top edge deserves particular attention. It will carry the weight of the entire calendar, including whatever you place inside the pockets.
You can reinforce the top edge with an extra strip of fabric behind the hanging sleeve. This is a small construction detail, but it can make the calendar last much longer.
Step 11: Make a Strong Hanging Sleeve
A hanging sleeve is a better choice than simply attaching ribbons to the corners because it spreads the weight across the width of the calendar.
Cut a strip of sturdy cotton slightly shorter than the finished width of the calendar. Finish the short edges, fold the long edges inward, and sew the sleeve securely to the back.
Place it near the top but leave enough space for the binding and the dowel. The sleeve should be attached securely through the backing and quilt structure. Do not rely on a few stitches through only the backing fabric.
A wooden dowel can then slide through the sleeve. Add ribbon or cord at both ends and hang the calendar from a strong wall hook.
If your calendar is large or you plan to fill the pockets with heavier gifts, use a stronger dowel and appropriate wall hardware. A calendar filled with 24 small gifts weighs much more than an empty quilt.
This is also where you can decide whether the calendar should hang from a wall, door, staircase, or mantel. Make the hanging structure appropriate for the location rather than treating it as an afterthought.
What Should You Put Inside the 24 Pockets?
The best part of a fabric Advent calendar is that the pockets do not have to contain 24 pieces of candy.
You can put a small treat in some pockets and a handwritten note in others. You can also add family activities: decorate the tree, watch a Christmas movie, bake cookies, visit a Christmas market, call a family member, or make a handmade ornament.
If the pockets are large enough, you can include small toys, craft supplies, hair accessories, jewelry, gift cards, puzzle pieces, or tiny books.
You can even create one larger activity across several days. For example, Day 4 could contain the first clue, Day 10 another clue, and Day 18 the final one.
This makes the calendar part of your Christmas routine rather than simply another decoration.
If you want to make the project a reusable family tradition, consider writing the activities on small cards instead of permanently attaching them. That way, you can change them every year.
How to Make the Village Feel More Detailed
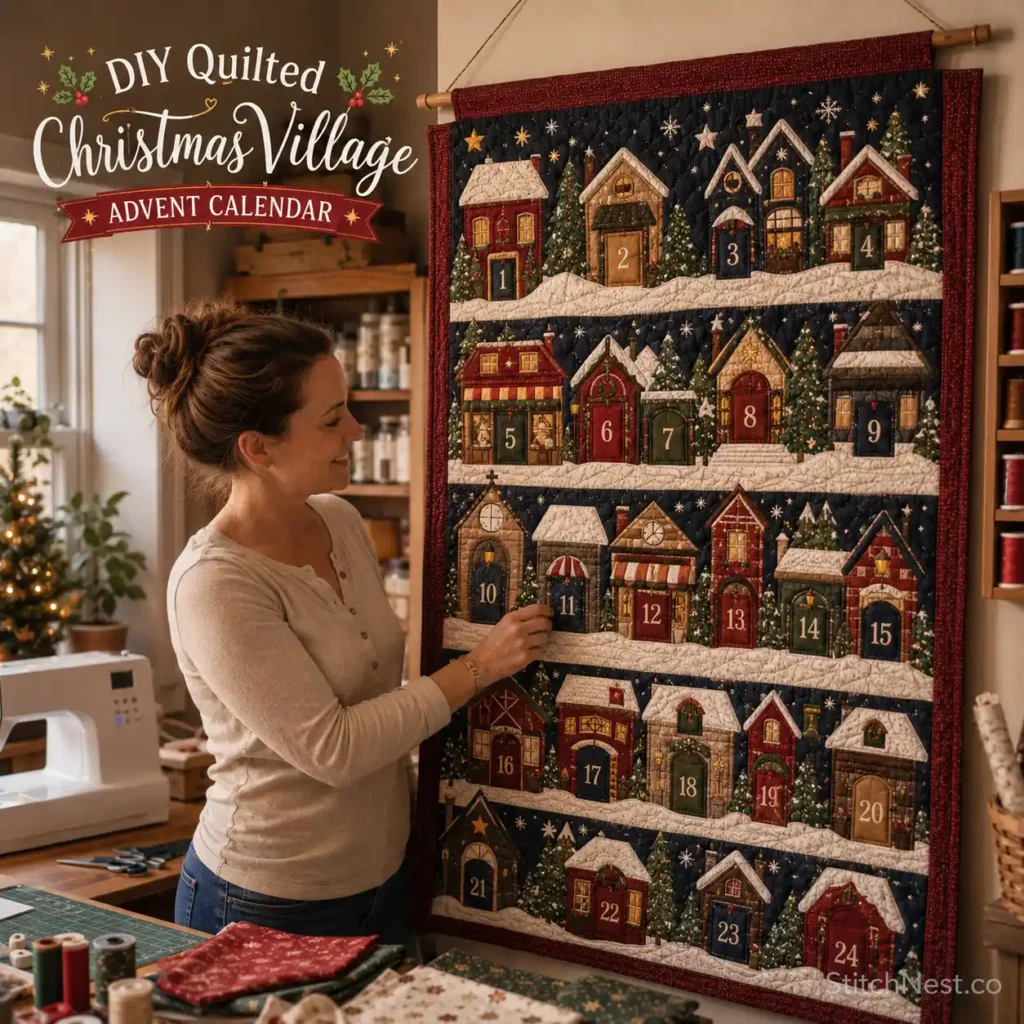
The temptation with a project like this is to keep adding details. More windows, more trees, more embroidery, more snow, more tiny pieces.
You do not actually need that much. A few carefully chosen details can make a simple house feel complete. Add a dark door, two windows, a roof, a chimney, and a little snow. That is enough for the brain to read it as a house.
You can add a tiny wreath to one door, a Christmas tree behind one window, or a small stitched path leading toward another building.
For an animal-loving family, add one tiny dog near a house. These quilted puppies patterns help with simple shapes that can be reduced into small appliqué pieces.
You can also add tiny cats, birds, snowmen, or reindeer. Just remember that every extra piece adds cutting and stitching time. A little empty space is useful too. Let some of the background fabric show through. It gives the village room to breathe and makes the houses easier to see.
Ways to Use Your Fabric Scraps
This project is particularly good for scraps because the individual pieces can be tiny.
Save small pieces for doors, windows, chimneys, stars, trees, and numbers. Medium scraps can become pocket fronts. Larger scraps can become houses or sections of the background.
You can also use scraps from previous projects that have nothing to do with Christmas. A blue fabric from a summer quilt can become the night sky. A floral print can become curtains. A green scrap can become a tree.
Even fabric from a denim project can work for roofs, doors, or borders. How to make a denim quilted table runner from old jeans is useful if you want ideas for combining reclaimed denim with quilting cotton.
If you have many tiny scraps, sort them by color rather than size. Keep a box for reds, greens, neutrals, blues, and metallic-looking fabrics. When you are ready to make a small appliqué, you can choose from the appropriate box instead of searching through everything.
That little habit makes scrap quilting much easier over time.
Common Mistakes to Avoid
One of the biggest mistakes is making the pockets too small. Remember that the calendar will be filled with real objects, not just flat pieces of paper. If you want to put small toys or several treats inside, give the pockets some depth.
Another common problem is attaching all 24 pockets before checking the spacing. Make paper pocket templates first and arrange them on the quilt. This lets you see exactly how much space the village needs.
Do not make the background too busy either. Christmas prints are beautiful, but twenty-four patterned pockets plus patterned houses plus patterned trees can become difficult to read.
Another issue is weak pocket stitching. Reinforce the upper corners because that is where the pocket receives the most pulling when someone reaches inside. Don’t have time left before the holiday season? Try these last-minute Christmas quilts instead!
Finally, do not underestimate the weight of the finished calendar. A quilted wall hanging with batting, backing, binding, 24 pockets, and small gifts can become surprisingly heavy. Plan the hanging sleeve and wall hardware accordingly.
Can You Make This Advent Calendar With Beginners?
Yes, but we recommend breaking it into smaller tasks. The background is straightforward quilting. The houses can be made from simple rectangles and triangles. The pockets are basic construction. The appliqué can be simplified to large shapes.
The most time-consuming part is not any single sewing technique. It is making 24 pockets and decorating enough of the village to make the whole piece feel finished.
If you are new to quilting, start with six houses and four pockets per house. You can make the four pockets for each house identical in construction and change only the fabric.
But if you’re comfortable with quilting, you can make the project more elaborate by piecing the buildings, adding dimensional roofs, embroidery, tiny appliqué, or more detailed quilting.
You can even make the project from a mixture of techniques. A pieced house can sit beside an appliquéd house, and a plain fabric tree can sit beside an embroidered one.
A quilted Christmas village Advent calendar gives you much more than a place to count down the days until Christmas. It becomes a small piece of seasonal décor that you can bring out year after year, fill with new activities, and eventually pass on to someone else. Why don’t you try making a quilted denim jeans for your next project?