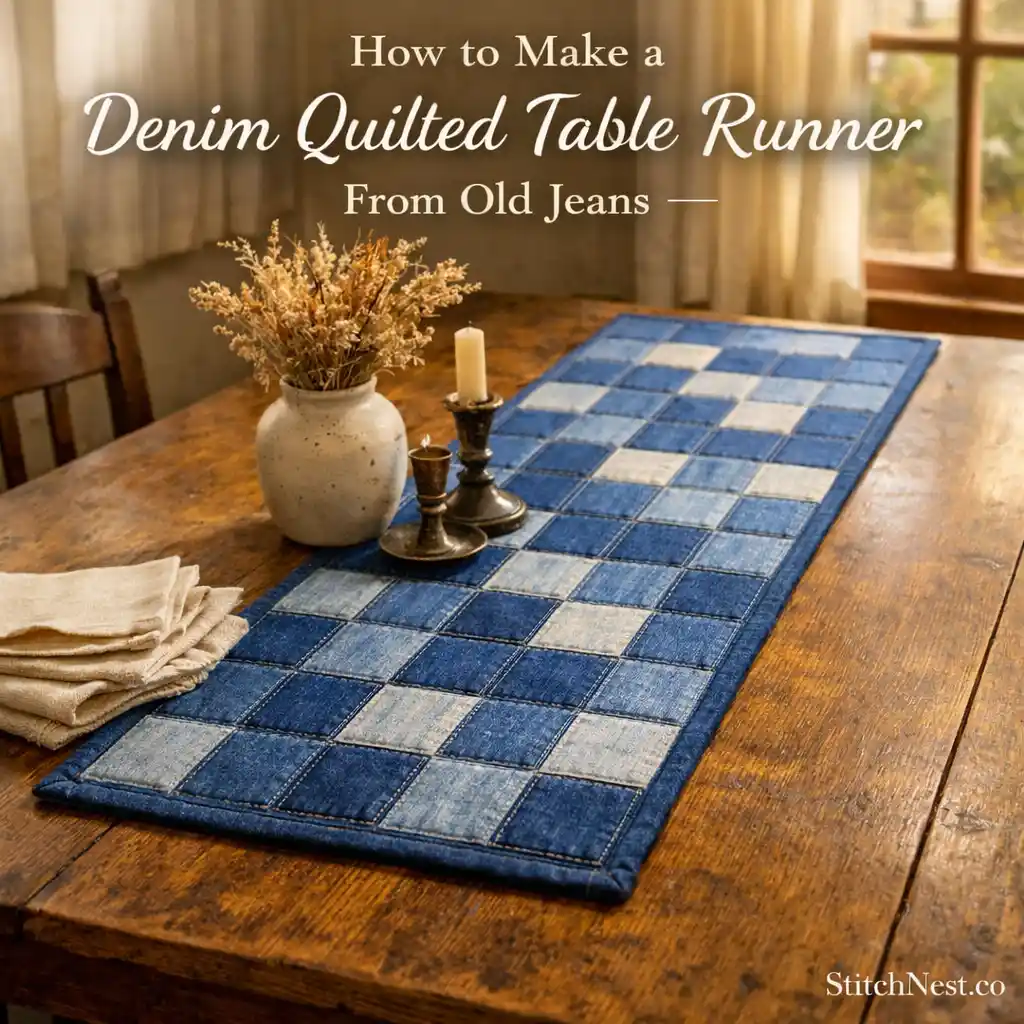
A denim quilted table runner is one of those sewing projects that looks beautifully layered and handmade without being overly difficult to put together. The mix of faded denim shades, visible seams, and textured quilting gives the finished piece a cozy cottage style feel that works in dining rooms, coffee tables, entryway consoles, or even outdoor farmhouse setups. This tutorial keeps the process beginner-friendly but detailed enough that your finished table runner still looks polished and thoughtfully made.
Things You’ll Need
- Rotary cutter with a self-healing cutting mat
- High-quality cotton fabric bundles
- Acrylic quilting rulers for precise shapes
- Sewing machine with quilting foot attachment
- Soft batting for a cozy finished feel
- 2 to 4 pairs of old denim jeans
- Cotton backing fabric
- Quilting ruler
- Neutral thread
- Pins or clips
- Iron for pressing seams
Make a Denim Quilted Table Runner
Step 1: Prepare and Cut the Denim
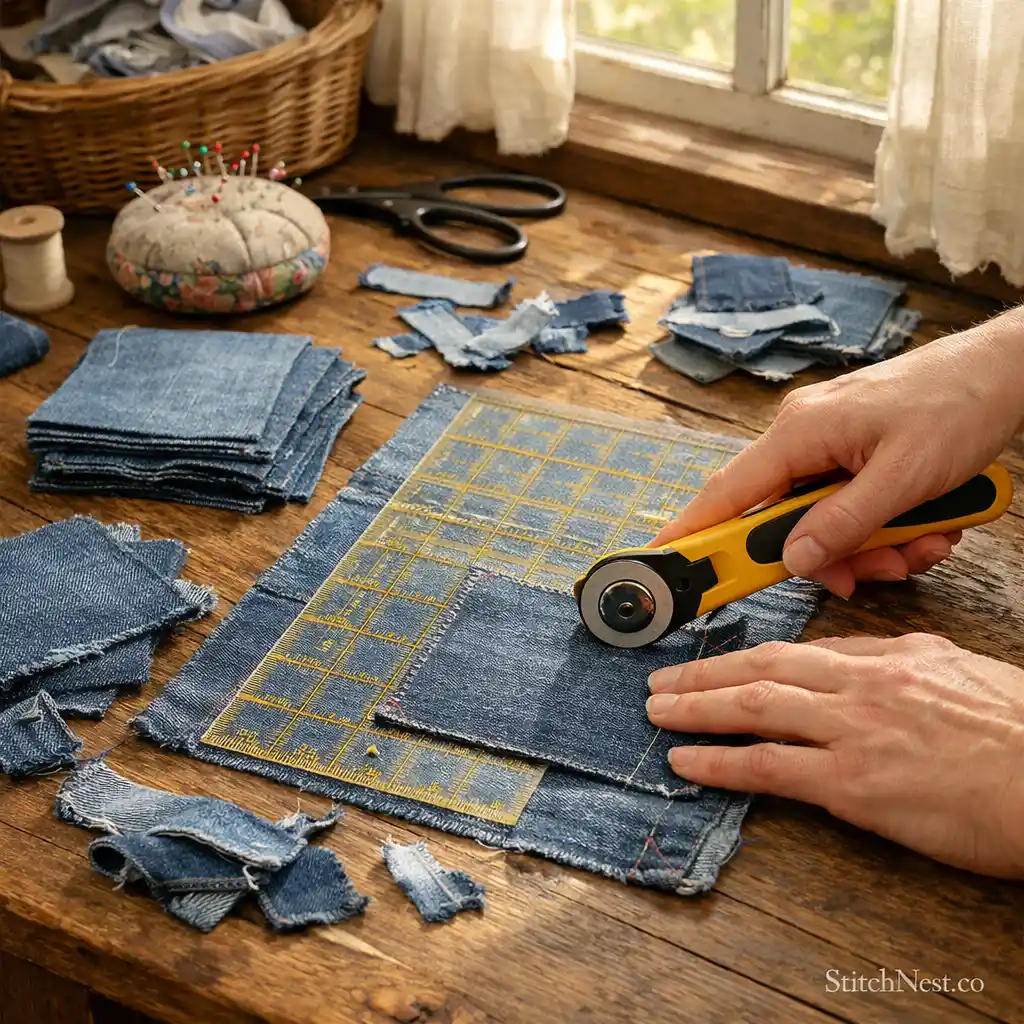
Start by cutting along the inseams of the jeans so the fabric opens and lays flat easily on your cutting surface. Then, remove bulky areas like belt loops, thick side seams, and heavy pocket sections because those layers become difficult to sew through once quilting begins. After separating the usable denim pieces, press everything flat with an iron before measuring and cutting your patchwork shapes.
For a beginner-friendly layout, cut squares measuring 5 x 5 inches or rectangles measuring 5 x 7 inches. Mixing both sizes gives the runner a softer patchwork look that works especially well with recycled denim. Here’s a helpful tip most beginners do not realize right away. Denim stretches slightly depending on how the jeans were originally worn, so using a quilting ruler during every cut helps keep the shapes much more accurate later during assembly.
Taking extra time here makes a huge difference because cleaner cuts almost always lead to straighter seams and a more polished quilt top.
Step 2: Arrange Your Denim Layout
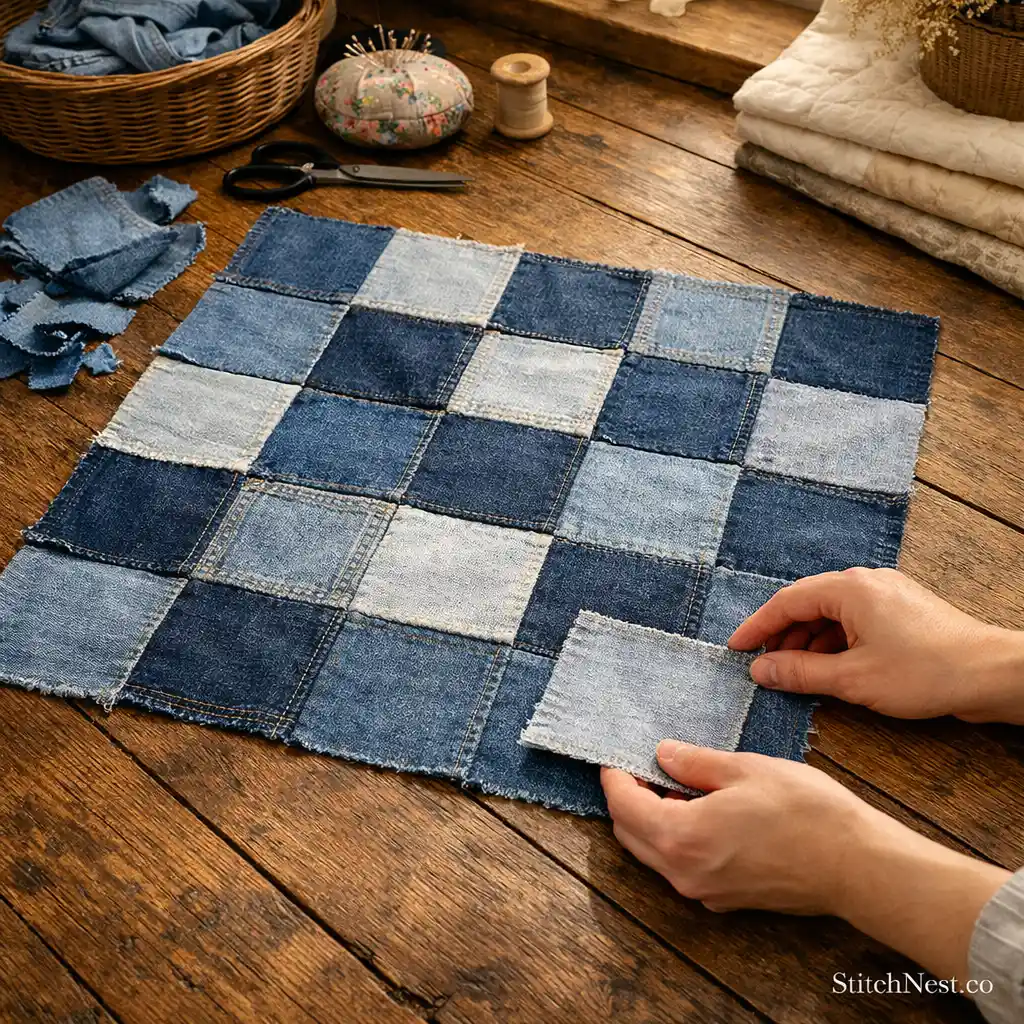
Before sewing anything together, spread all your denim pieces across a large table or even the floor so you can see the full layout clearly. Alternate darker and lighter shades across the runner to create visual balance. If too many dark pieces sit together in one area, the runner can start feeling visually heavy on one side.
You can arrange the pieces in clean rows for a more farmhouse-inspired look or mix the shades more casually if you want the runner to feel softer and more relaxed. Did you know denim changes appearance depending on lighting? A section that looks balanced up close can suddenly appear uneven from across the room. Stepping back every few minutes helps you catch those areas early before sewing begins. The same goes when you’re diving into other projects, like these French roses quilts!
This stage is worth slowing down for because once the rows are stitched together, changing the layout becomes much harder.
Step 3: Sew the Denim Rows Together
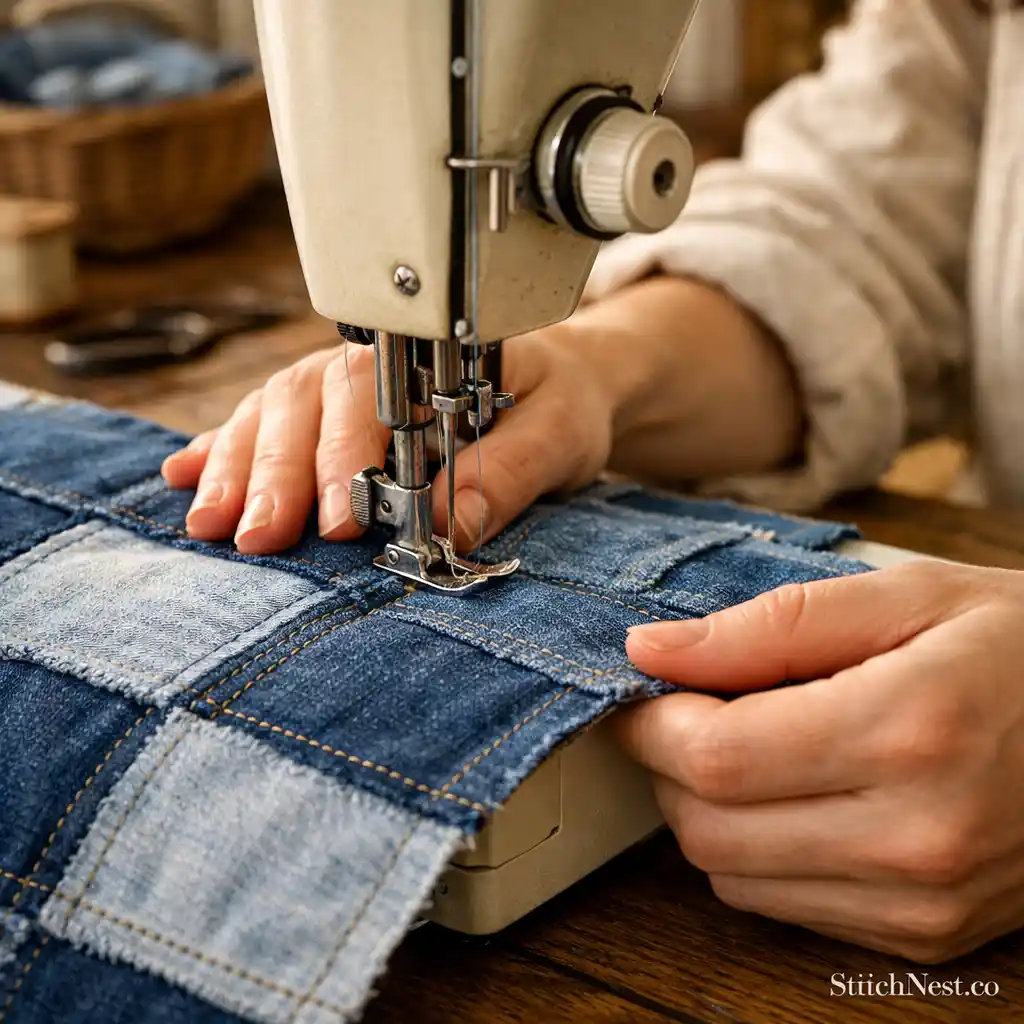
Take the first row and sew each denim piece together using a quarter-inch seam allowance. Continue row by row until all your sections are assembled. See, denim naturally creates more seam bulk than quilting cotton, so sewing slowly near thicker areas helps the fabric feed through the machine much more evenly.
After finishing each row, press the seams flat immediately instead of waiting until the end. This keeps the quilt top smoother and prevents bulky buildup later during quilting. Here’s something experienced quilters often do with denim projects. They slightly shorten the stitch length because recycled denim fabric has already softened over time, and tighter stitches help the seams stay cleaner and more secure.
Hey, have you tried these free mini heart quilt patterns? People are going crazy over them these days!
Step 4: Join the Rows Into One Quilt Top
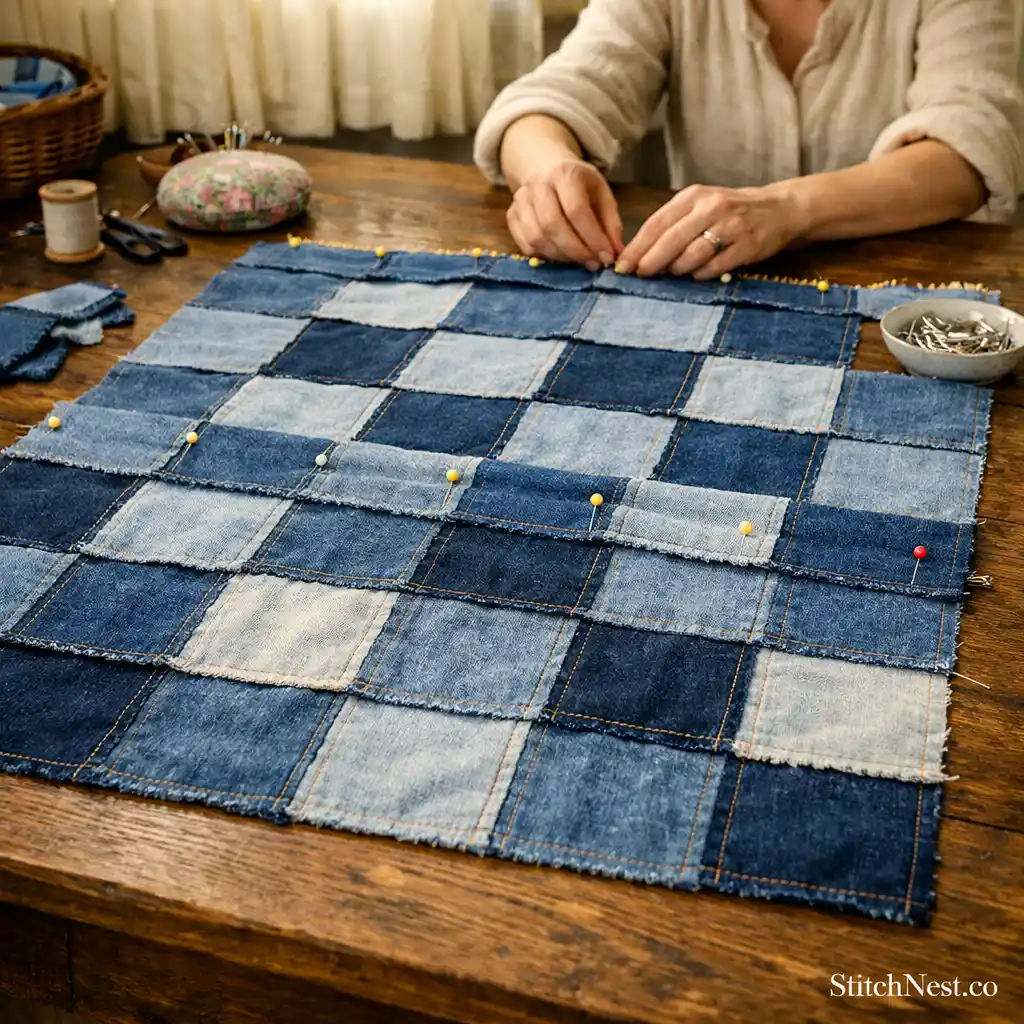
Place two completed rows right sides together and pin carefully before sewing along the edge. Continue attaching all rows until the full quilt top is assembled. Matching the seams slowly during pinning helps the corners line up much more neatly once stitched. Even slight shifting becomes noticeable in patchwork quilting, especially with denim, because the seam lines stand out more clearly against faded fabric.
A good habit here is pressing every row open before attaching the next one, as you do with jelly quilts. The quilt top immediately starts looking flatter and more structured, which also makes quilting easier later. Once the rows are fully joined, give the entire quilt top one more thorough press before moving on to the next step.
Step 5: Cut the Batting and Backing Fabric
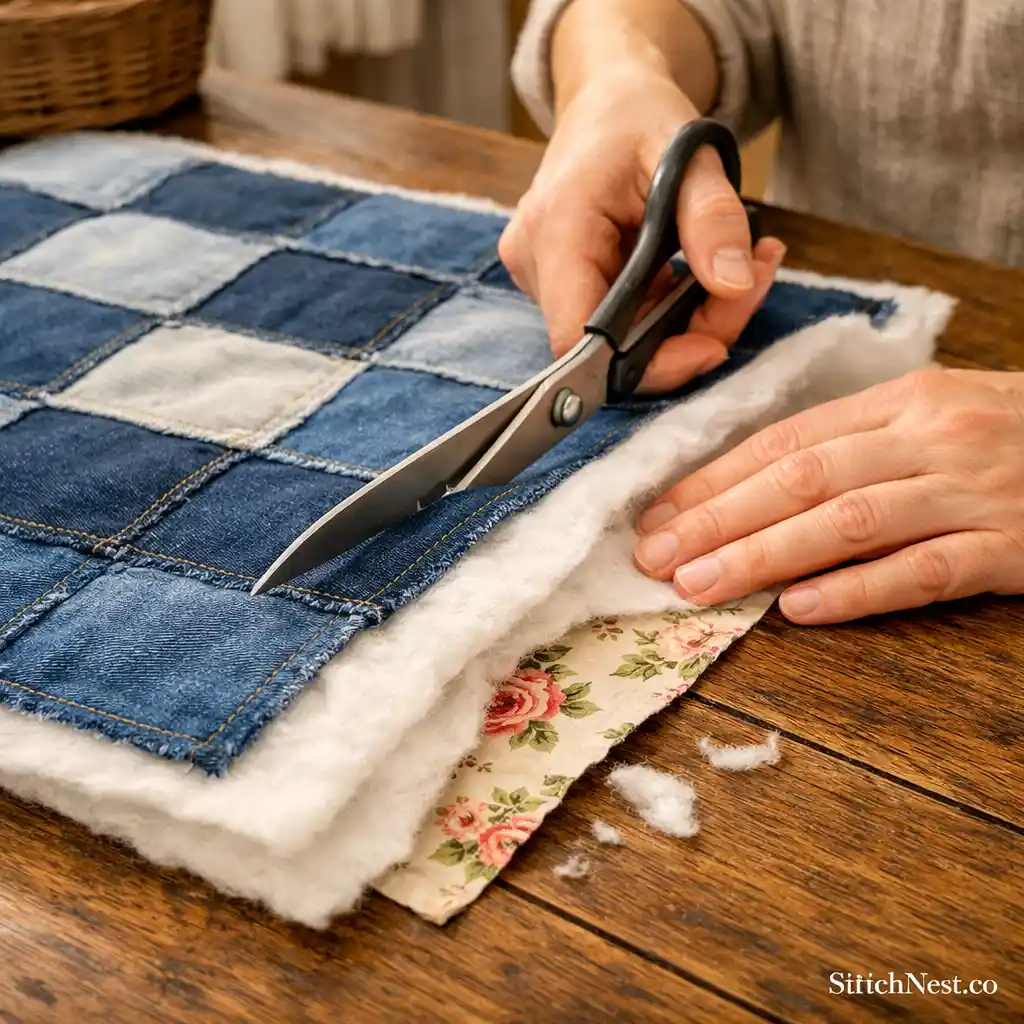
Lay the finished denim quilt top across your batting and backing fabric. Cut both layers about one inch larger than the quilt top on all sides. This extra space gives you room to adjust the layers slightly during quilting without worrying about shifting.
Cotton or linen backing fabric works beautifully for cottage-inspired projects because it softens the heavier texture of denim very naturally. One thing we usually avoid is slippery backing fabric because it tends to move too much underneath the quilt top during sewing. Stable fabric keeps the layers easier to manage, especially for beginners working with denim for the first time. If you’re a new quilter, maybe try these crumb quilts; they’d be perfect for you!
Before you toss those leftover strips and squares into storage, try putting them to work in a scrappy quilt. A few fabric scraps can become a colorful quilt top much faster than you might expect.
Step 6: Create the Quilt Sandwich
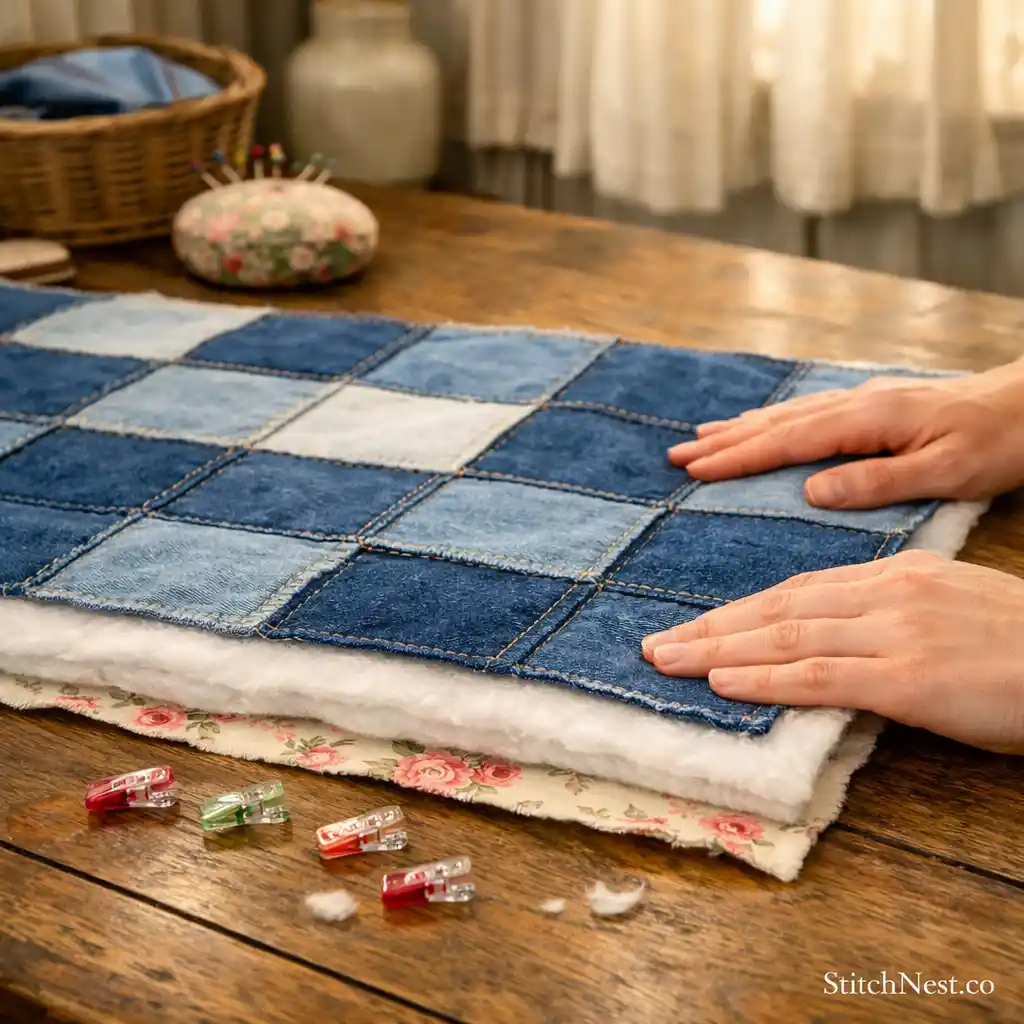
Place the backing fabric face down first, then the batting, and finally the denim quilt top facing upward. Smooth each layer carefully before pinning or clipping everything together. Since denim has more weight than regular quilting cotton, securing the layers properly is very important here.
Start pinning from the center and work outward gradually. This helps prevent wrinkles from forming underneath the quilt top during quilting. Here’s a small detail that makes a surprisingly big difference. Running your hands across the layers after every few pins helps catch tiny folds early before they become stitched permanently into the runner.
Once all the layers are secured, the project finally begins feeling like a real quilt instead of separate fabric pieces.
Step 7: Quilt the Layers Together
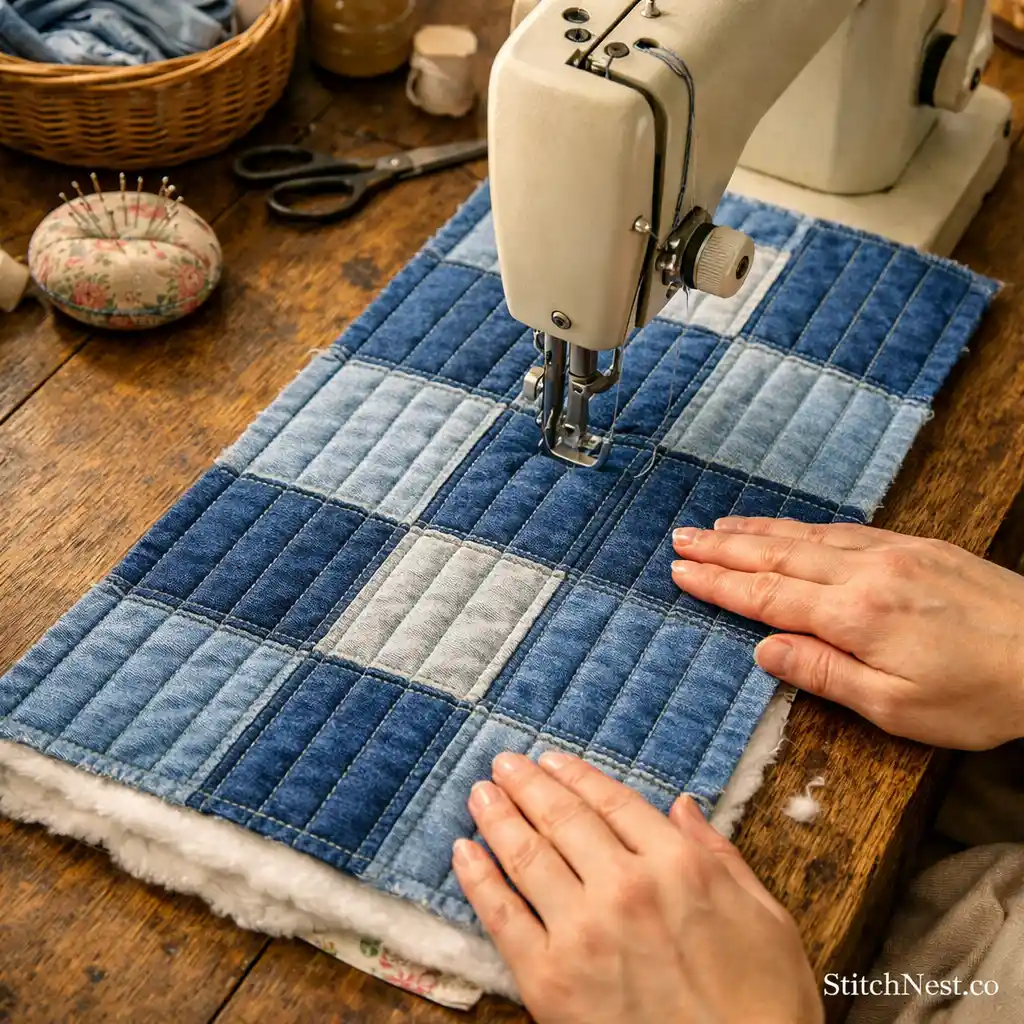
Sew straight quilting lines vertically or diagonally across the runner. Denim already carries a strong texture and visible seams, so simple quilting patterns usually create the cleanest result. Overly detailed quilting can start competing with the patchwork instead of enhancing it.
Take your time around thicker seam intersections and avoid pulling the quilt through the sewing machine manually. Let the feed dogs move the fabric naturally. Here’s a useful tip if you are quilting denim for the first time. Rolling the sides of the runner inward slightly makes the heavier layers easier to control under the machine. And have you tried these lovely free DIY flower quilt patterns yet?
Step 8: Trim and Bind the Edges
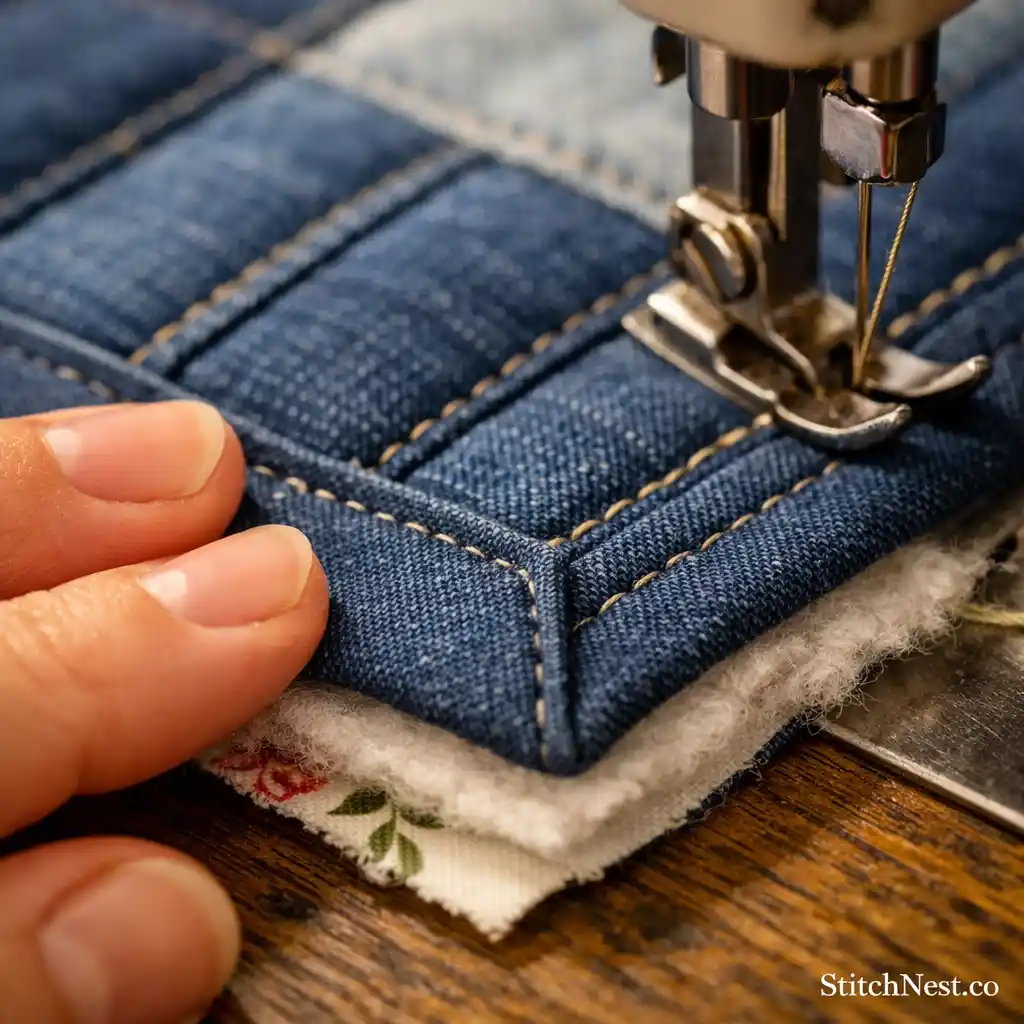
Trim away the excess batting and backing fabric evenly around all four sides of the runner. Attach binding using denim strips or folded cotton fabric strips, depending on the finish you want. Denim binding creates a slightly more rustic look, while cotton binding softens the edges visually.
Mitered corners instantly make the runner look cleaner and more professionally finished. Instead of rushing around the corners, sew slowly and fold carefully so the edges stay crisp and even. Here’s something many experienced quilters prefer for projects like this. Hand stitching the back side of the binding creates a much softer and neater finish than machine stitching both sides.
Step 9: Final Pressing and Styling
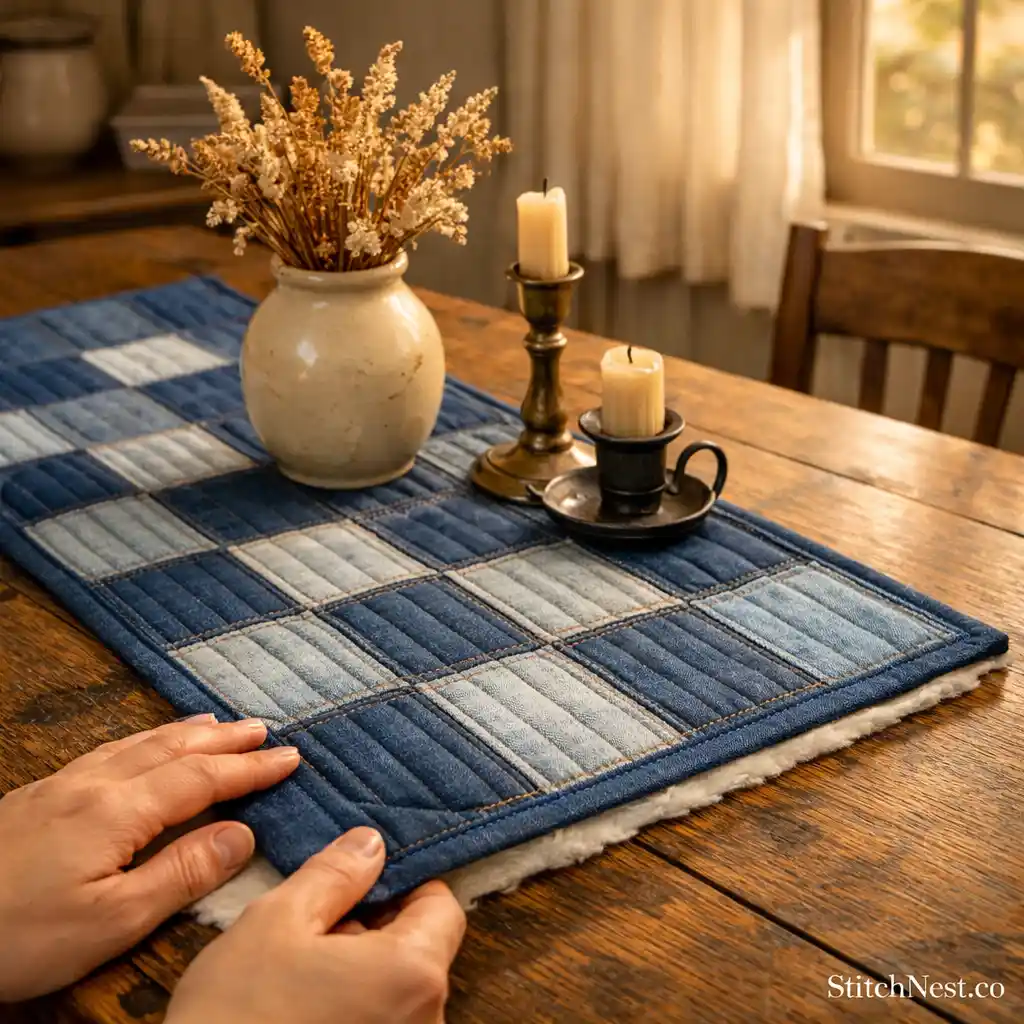
Give the finished table runner one final press to flatten the seams and help the quilting settle evenly. Denim softens beautifully after pressing and immediately starts looking more refined and finished. You will also notice the quilting lines becoming more visible once the fabric relaxes slightly.
Place the runner across a farmhouse dining table, layered over linen, wood, or vintage decor pieces for that cozy cottage-inspired look. Did you know small imperfections are actually part of what makes a denim quilted table runner feel special? Tiny shifts in color, visible fading, and subtle seam texture give the runner a personality that brand-new fabric often does not have.
Once styled on a table, the finished piece feels sturdy enough for everyday use but still warm and handmade in the best possible way.
Practical Tips for a Cleaner Denim Quilt Runner
- Use denim with a similar fabric weight so the quilting feels balanced
- Avoid sewing directly through bulky pocket seams or thick belt loop areas
- Mix faded and dark denim evenly for better visual contrast
- Slightly longer quilting lines suit denim better than overly detailed patterns
Common Mistakes to Avoid When Making a Denim Quilted Table Runner
One of the biggest beginner mistakes is using denim pieces that are too thick or uneven in weight. The sewing machine starts struggling quickly once several bulky layers stack together. Another common issue happens during layout planning. If all the darker denim ends up grouped together, the runner can look visually heavy on one side.
Skipping seam pressing also causes problems later because denim holds bulk much more than quilting cotton. Taking a few extra minutes with the iron keeps the project flatter and easier to quilt. Finally, many beginners rush the binding step after finishing the quilting, but clean edges are often what make a quilted runner look professionally handmade instead of unfinished. Do try these baby quilts next!
A denim quilted table runner is one of those projects that feels both practical and deeply personal because every faded patch and seam carries a little character from the original fabric. The finished runner ends up durable enough for daily use, but still soft and warm enough to feel handmade in the best possible way. Don’t forget to try out these modern block quilt ideas, either!