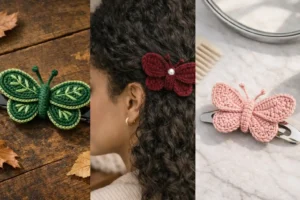
If you’ve been wanting a small, satisfying crochet project, this DIY crochet butterfly is a perfect place to start. It’s quick, beginner-friendly, and uses only basic stitches you likely already know. Just read on, and by the end, you’ll have a neat little piece you can turn into accessories, décor, or gifts. Follow along step by step, and you’ll see how simple it really is.
Turn Your DIY Crochet Butterfly Into Something You’ll Actually Use
Once you’ve finished your butterfly, don’t just set it aside! This little piece can easily become something wearable or gift-worthy with just a few extra steps. Just click on the headings, and they’ll take you to our handpicked DIY patterns!
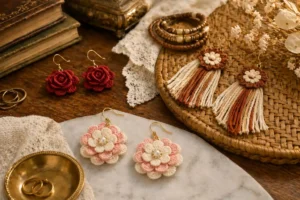
Butterfly Earrings
Lightweight and easy to make, these are perfect if you want something subtle but handmade. All you need is a pair of hooks and a secure way to attach the butterfly at the center.
Butterfly Necklace
Use your butterfly as a focal charm by attaching it to a simple chain or cord. This works especially well with slightly stiffer yarn, so the shape holds nicely when worn.
Butterfly Hair Tie
Secure your butterfly onto a hair elastic for a soft, everyday accessory. It’s a great option if you want something quick, practical, and easy to gift.
Crochet Butterfly Appliqué
Stitch your butterfly onto a denim jacket, tote bag, or blanket to add lovely texture and color to your favorite items.
Crochet Butterfly Bag Charm
You can make a lovely small charm that will hang around your bag, headphones, phone, or pretty much anything, sprucing it up!
Butterfly Crochet Top
You can also go for butterfly crochet summer tops to style up your beach outfit and stand out from the crowd!
Love crocheting flowers? Our DIY crochet hibiscus flower tutorial walks you through every step and shows you how to create a realistic bloom you can add to bags, hats, hair clips, and more.
Crochet Butterfly Granny Square
Love crochet butterflies? The next step is turning them into something even more versatile. Make them into granny squares so you can use them on clothing, bedsheets, even bags!
Crochet Butterfly Bookmarks
They’re quick to make, use very little yarn, and happen to be some of the prettiest handmade gifts you can slip between the pages of a favorite book.
Want a project you can finish in an afternoon? This cute crochet ghost is one of our fastest and most satisfying seasonal makes.
Crochet Butterfly Coaster Patterns
Some crochet projects earn compliments every time they’re used. Take a look at these butterfly coaster patterns that are just as pretty on display as they are under your favorite mug.
Crochet Butterfly Keychain
These crochet butterfly keychain patterns are fun to make, easy to customize, and perfect for using up leftover yarn.
Crochet Butterfly Amigurumi Patterns
These crochet butterfly amigurumi patterns turn a simple butterfly into an adorable plush you’ll love making.
Maybe try this lovely DIY daisy flower tutorial as well. It’s great for beginners!
Things You’ll Need
- Fine cotton yarn in multiple colors
- Steel crochet hooks in small sizes
- Yarn needle for weaving in ends
- Small embroidery scissors
Ready to upgrade your crochet tools? The Clover Amour Crochet Hook Set is one of the smoothest hook sets available and a favorite among experienced crocheters. It glides through cotton yarn beautifully and helps reduce hand fatigue during longer projects.
DIY Crochet Butterfly Tutorial Easy
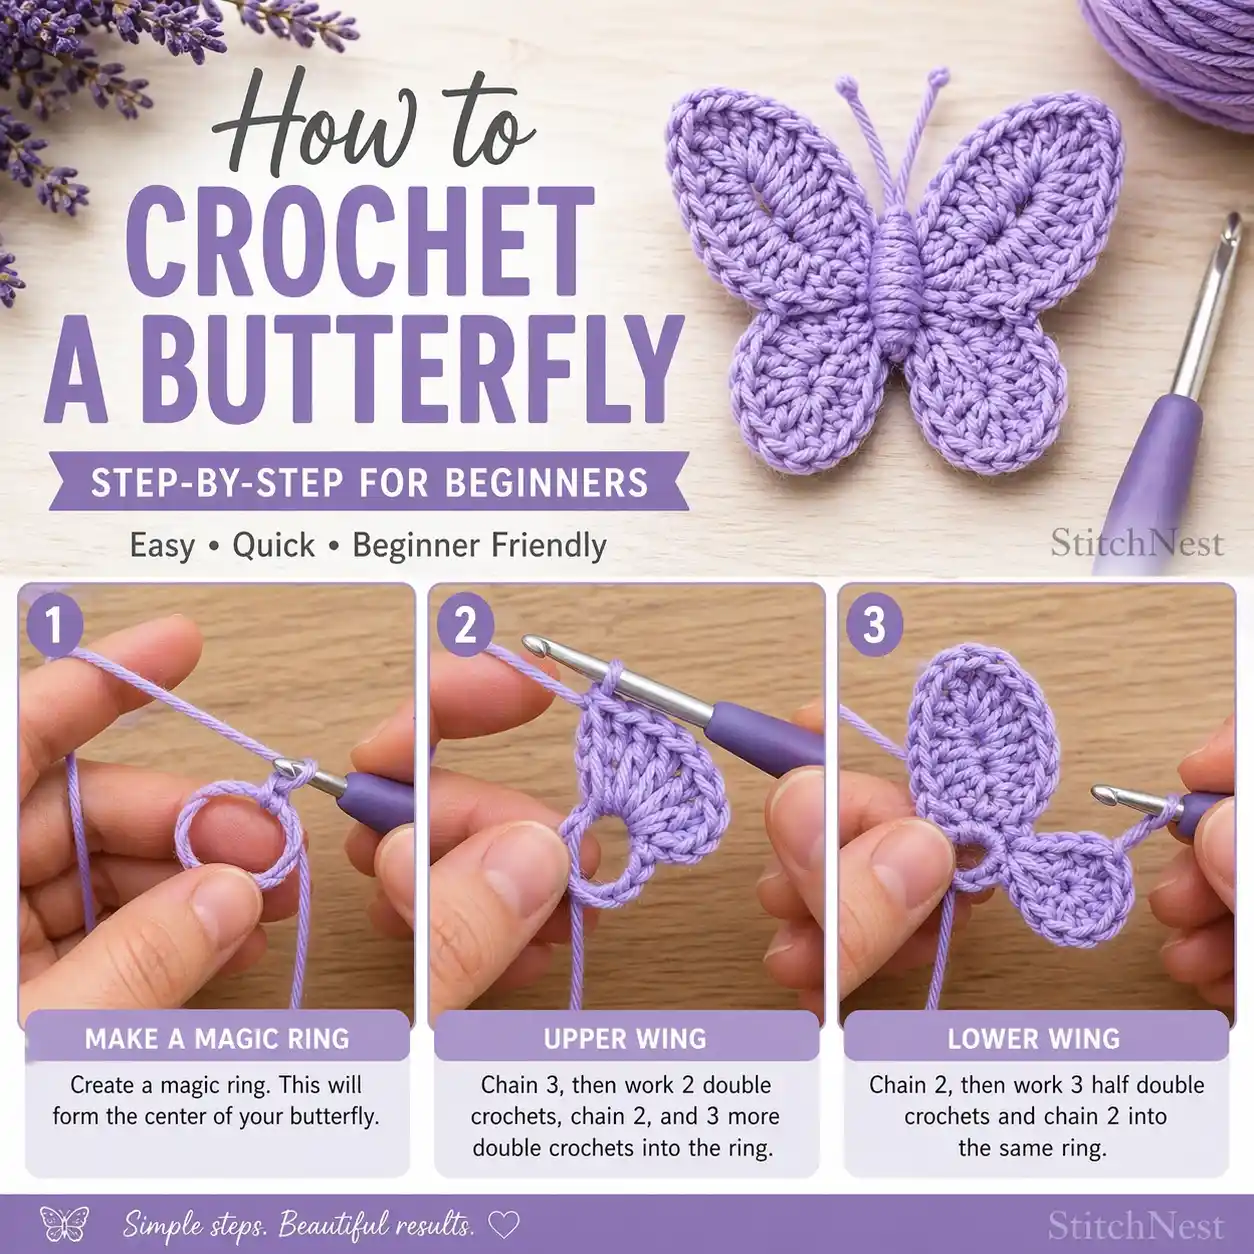
Step 1: Make a Magic Ring
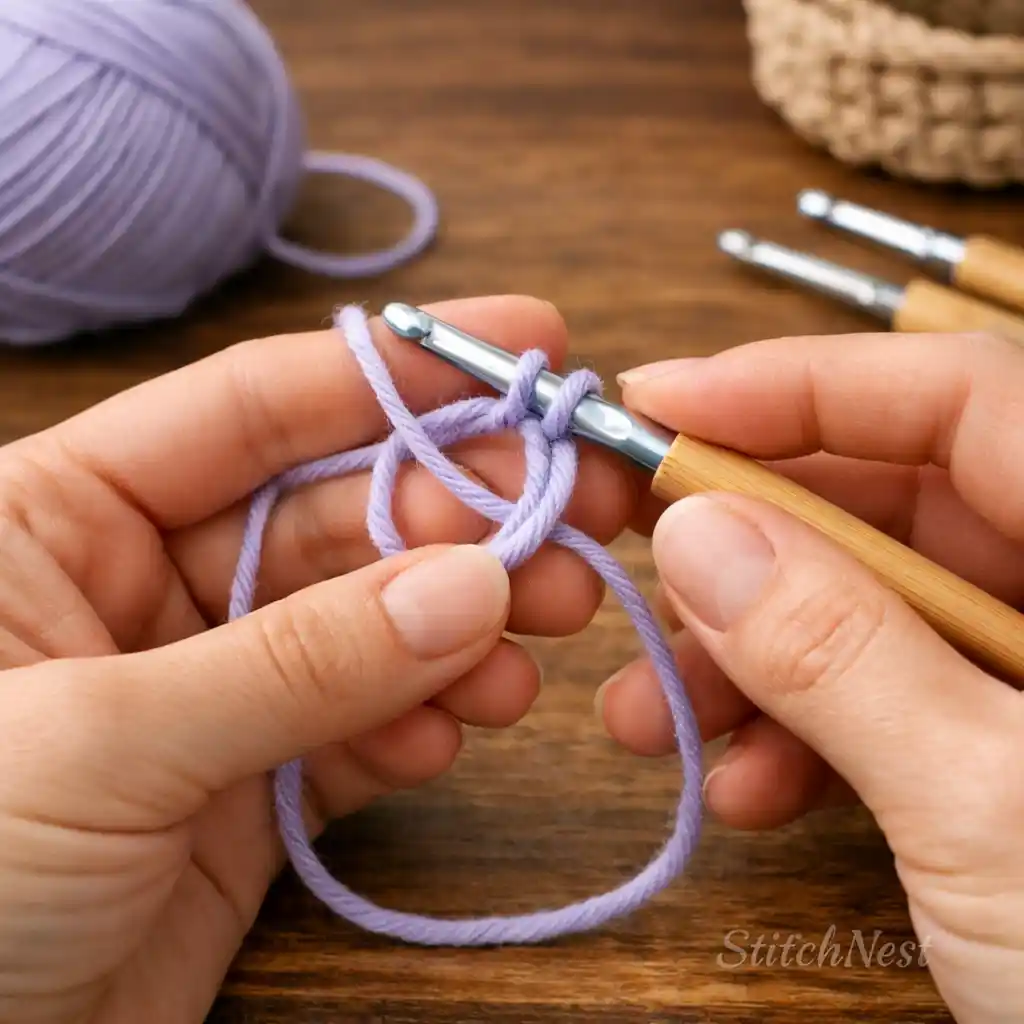
Start by wrapping the yarn around your fingers to form a loop, then insert your hook and pull up a loop to create a magic ring. Keep your grip relaxed here. If you hold the yarn too tightly, it’ll be harder to work stitches into the ring later.
Leave a slightly longer tail than usual; this makes tightening the center much easier at the end. If the magic ring feels tricky, chaining 4 and slip stitching into a loop works just fine, but the center won’t close as neatly.
Step 2: Create the First Wing (Upper Wing)
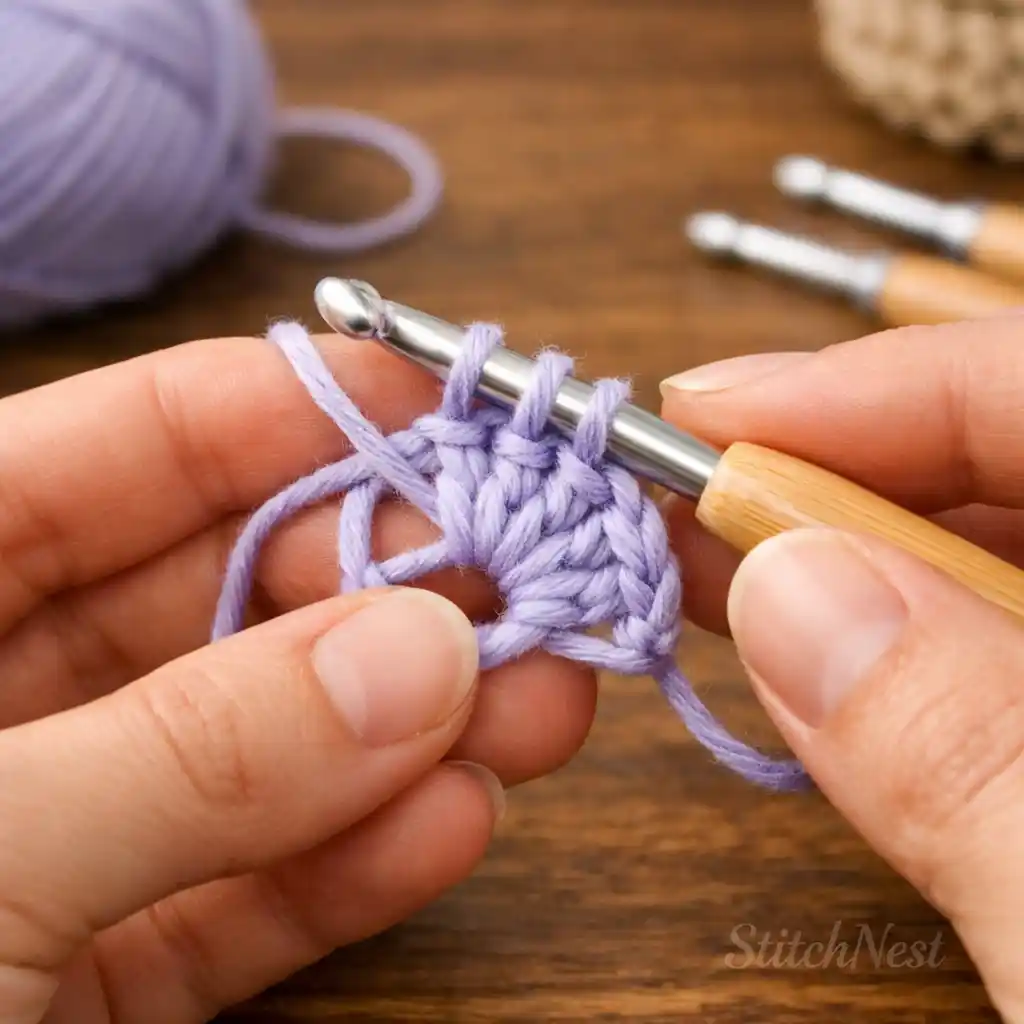
Chain 3 (this counts as your first double crochet), then work 2 more double crochets into the magic ring. Together, these stitches form the first half of the upper wing.
Next, chain 2 to create the center space of the wing, then work 3 more double crochets directly into the center of the same magic ring. At this stage, everything is still being worked into the ring itself. Don’t join, slip stitch, or close the wing before moving to the next section. This completes the first upper wing.
Try to keep your stitches slightly loose as you work. Tight stitches can cause the wing to curl inward and make shaping more difficult later.
Beginner Mistake: Don’t turn your work or start crocheting into the stitches you’ve just made. Every stitch in this tutorial is worked directly into the magic ring until Step 5.
Step 3: Form the First Lower Wing
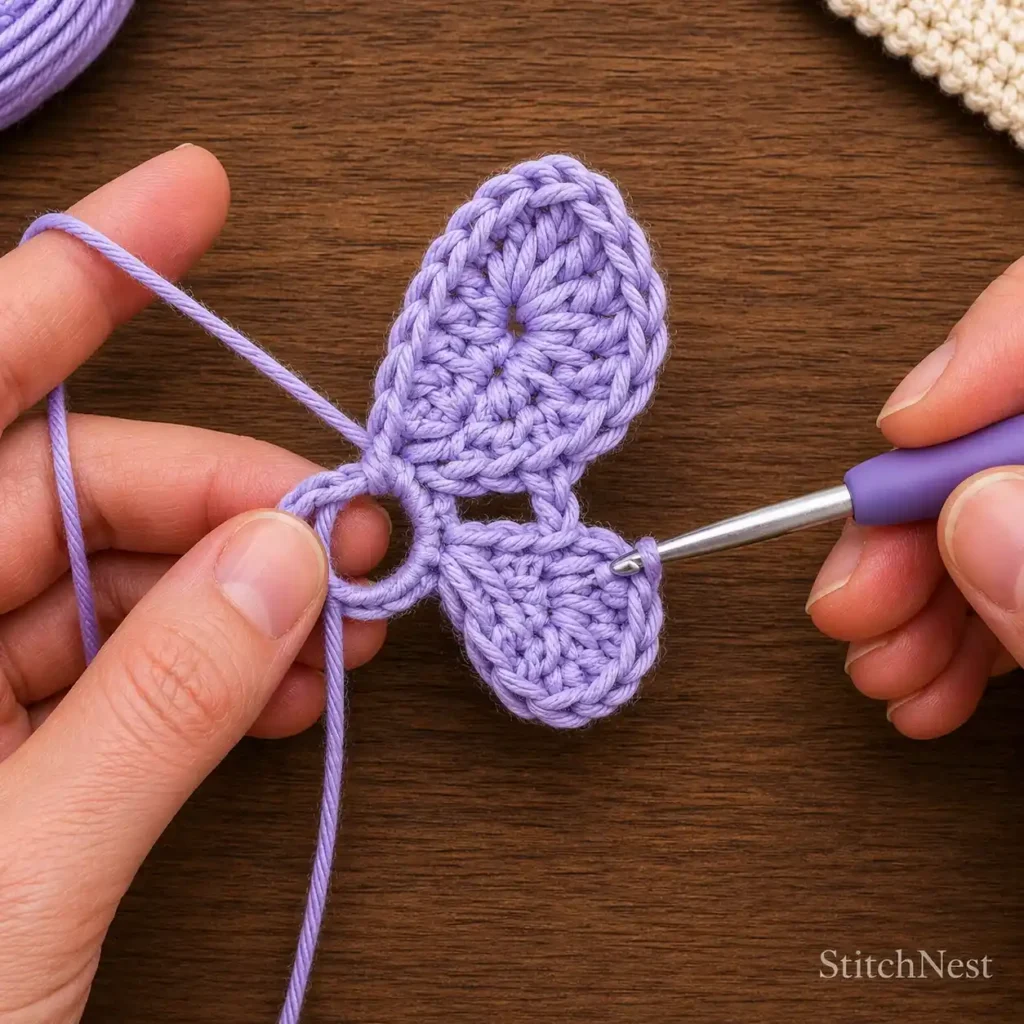
Chain 2, then work 3 half double crochets into the same magic ring. Chain 2 again to finish the lower wing section.
Using half double crochets here creates a smaller wing that balances the larger upper wing nicely. It’s important that every stitch up to this point is worked into the center of the magic ring. Don’t crochet into the double crochets, chain spaces, or previous stitches. The butterfly won’t fully take shape until the ring is tightened later.
If you’re liking this one, then you’ll have loads more fun trying this DIY crochet dragonfly tutorial! Don’t miss out!
What your work should look like: At this point, you should have one large upper wing and one smaller lower wing attached to the magic ring. The project will probably look uneven or more like a small fan than a butterfly, and that’s completely normal.
Step 4: Repeat for the Opposite Side
Now create the second half of the butterfly by repeating the same wing pattern on the other side of the ring.
Work 3 double crochets, chain 2, and 3 more double crochets into the magic ring to form the second upper wing. Then chain 2, work 3 half double crochets, and chain 2 to create the second lower wing.
Take a moment to compare both sides before moving on. The wings don’t need to be perfectly identical, but they should look balanced in size and spacing.
Quick Stitch Sequence Reference
All stitches are worked directly into the magic ring.
Ch 3, 2 dc, ch 2, 3 dc, ch 2, 3 hdc, ch 2, 3 dc, ch 2, 3 dc, ch 2, 3 hdc, ch 2.
You should have:
- 2 upper wings, each made from two double crochet groups separated by a chain-2 space
- 2 lower wings made from half double crochet stitches
- Chain-2 spaces separating each wing section
If your butterfly doesn’t look symmetrical before tightening the ring, double-check the stitch count before moving on.
Before moving on, check your stitch count:
✓ 2 upper wings
✓ 2 lower wings
✓ 4 groups of double crochets
✓ 2 groups of half double crochets
✓ Every stitch should still be worked into the magic ring.
Before You Continue
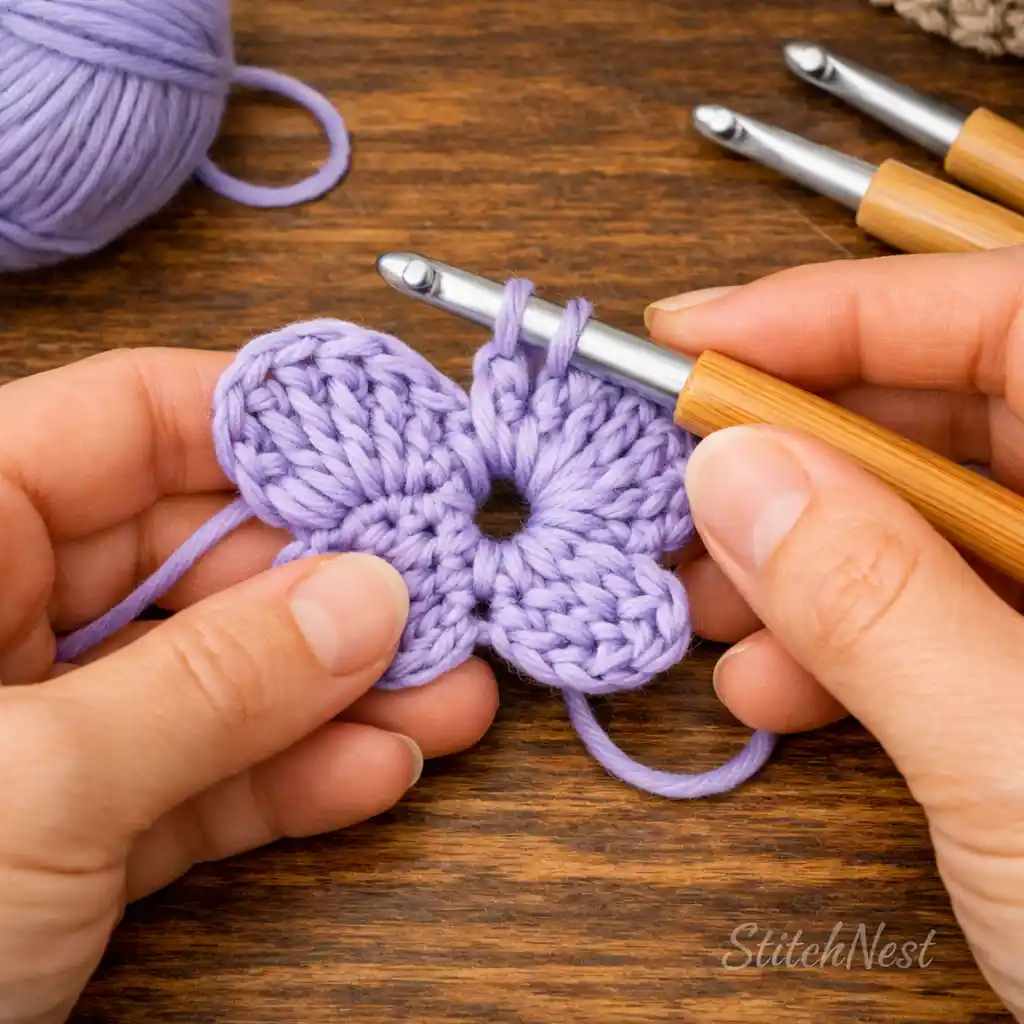
At this stage, your butterfly may not look much like a butterfly yet. That’s completely normal. All four wing sections are still attached to the open magic ring, and the shape will appear loose or uneven. Resist the urge to join or close individual wings. The butterfly comes together when the magic ring is tightened in the next step.
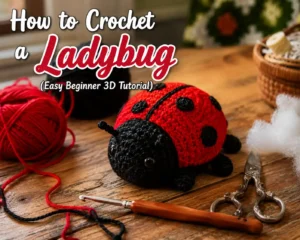
If you’re looking for a beginner-friendly amigurumi project, our DIY Crochet Ladybug Tutorial teaches you how to crochet an adorable 3D ladybug with step-by-step instructions, helpful tips, and plenty of finishing advice.
Don’t worry if yours doesn’t resemble the finished butterfly yet. Until you tighten the magic ring in the next step, the wings will look loose, floppy, and uneven. Many beginners think they’ve made a mistake here, but the butterfly only takes shape after the center is pulled closed.
Step 5: Tighten and Secure the Center
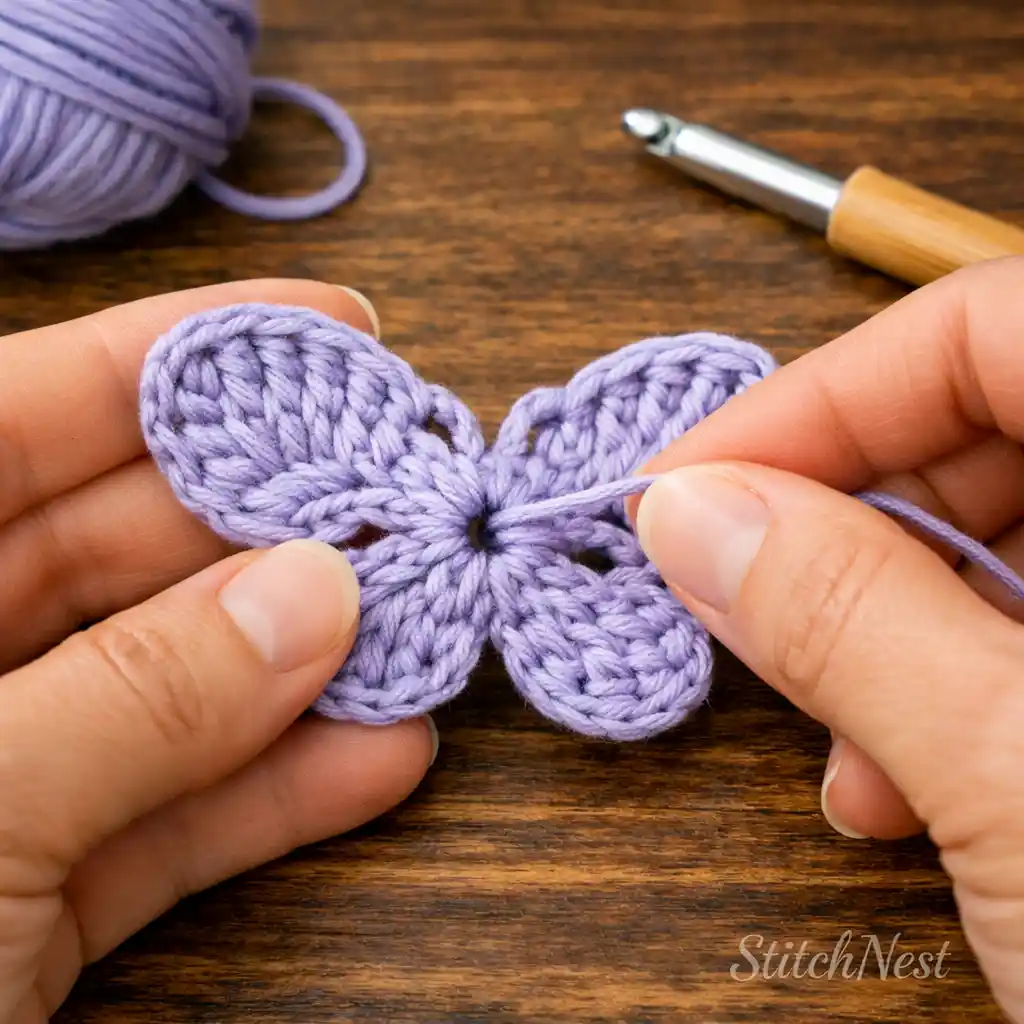
Note: Before tightening the magic ring, count your wing sections. You should see two upper wings and two lower wings arranged around the center.
Once all four wing sections have been completed, gently pull the yarn tail to close the magic ring. As the center tightens, the wings will naturally spread into their final butterfly shape. Many beginners think they’ve made a mistake before this step because the butterfly can look messy or uneven while the ring remains open.
Do this slowly while holding the stitches in place so they don’t bunch unevenly. When the center is fully closed, make a slip stitch into the top of the beginning chain-3 to secure everything.
This step brings the entire butterfly together, so take a moment to adjust any uneven loops before tightening completely.
Once you’ve finished this project, try making a few crochet hearts. They’re beginner-friendly, easy to customize, and useful in all kinds of handmade gifts.
Step 6: Create the Butterfly Body
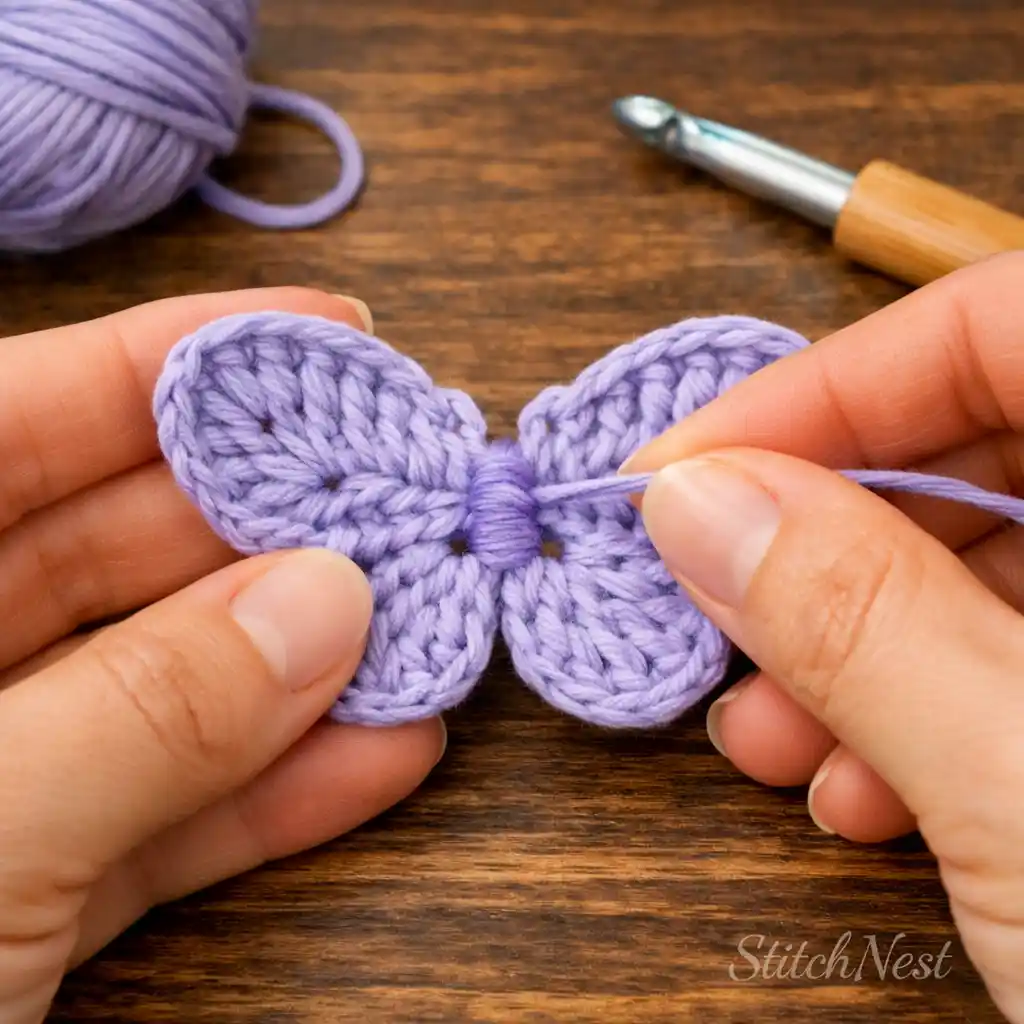
Cut a slightly longer strand of yarn and wrap it around the middle of the butterfly several times to form the body. Keep the wraps snug but not so tight that they distort the wings.
Once it looks balanced, tie a secure knot at the back. If you’d like antennae, leave two short strands at the top before trimming.
Crocheting at night or with darker yarn? The Brightech LightView Pro Magnifying Floor Lamp with Magnifier provides bright, natural lighting that makes stitches much easier to see and reduces eye strain during long crochet sessions.
Step 7: Shape and Finish Your DIY Crochet Butterfly
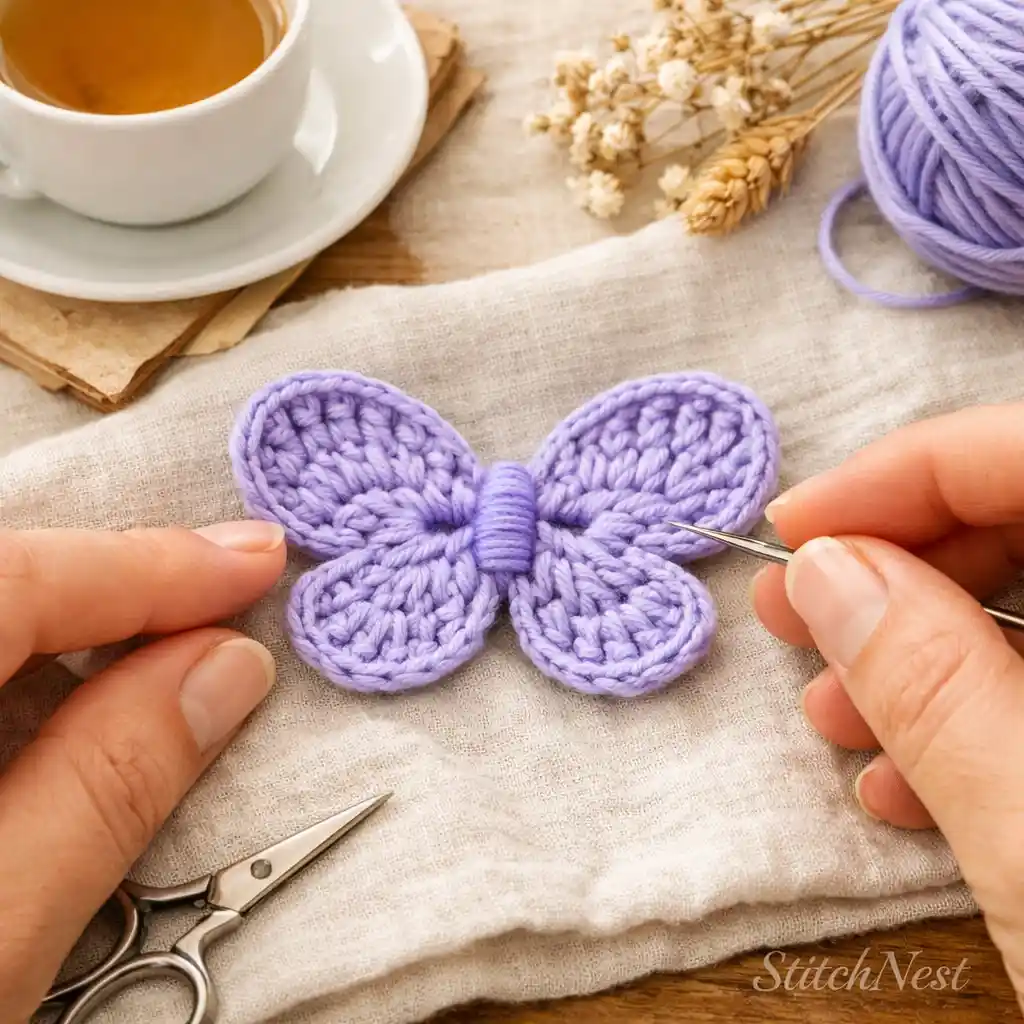
Now gently shape each wing using your fingers. Just spread them out evenly and flatten any curled edges. If needed, you can lightly steam or press the butterfly for a more polished look (especially with cotton yarn).
Finally, use a yarn needle to weave in loose ends securely so nothing comes undone over time.
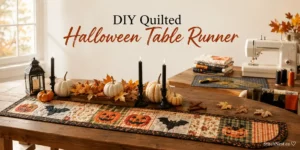
Finished this project already? The DIY Quilted Halloween Table Runner is another beginner-friendly tutorial that’s perfect for using your favorite Halloween fabrics and practicing your quilting skills.
Why doesn’t my butterfly look like yours?
The most common reason is that the magic ring hasn’t been tightened yet. Before Step 5, the butterfly will often look uneven or resemble a flower rather than a butterfly. Also, make sure every stitch in Steps 2–4 is worked into the center of the magic ring, not into the stitches from the previous wing.
If you crochet regularly, this is worth every penny. A Stanwood Large Metal Yarn Ball Winder turns messy skeins into neat yarn cakes that feed smoothly and help prevent tangles. It’s one of the best long-term investments for any crocheter.
Once you’ve gone through the steps, you’ll notice how quickly this becomes second nature. It’s the kind of project you can repeat without much effort, and each one gets cleaner than the last. Try a few more in the same style or switch up yarn later for variation. Save this for later or share it with someone who’s learning crochet; it’s a solid piece to practice with.
Hello, please this doesnt work, you forgot to wrote how many times you have to repeat the crochets Stitches
Thank you for pointing this out! You were right that the stitch sequence needed a bit more clarification. We’ve updated the tutorial with a full stitch reference and clearer instructions for the wing sections. We really appreciate your feedback; it helped us make the tutorial easier to follow for everyone 🙂
Bonjour, je crochète depuis toujours et je pense que le soucis est qu’à un moment il faut arrêter de piquer dans le cercle magique, je pense qu’il faille fermer l’aile avant de recommencer l’autre.
Je compare mon travail avec la photo dès le début et ça ne correspond pas du tout 😒
Thanks for pointing that out! You’re actually still working into the center of the magic ring during those steps, so you don’t need to close or join each wing before starting the next section. That can definitely feel a little confusing because the butterfly doesn’t really look like a butterfly until we tighten the magic ring in Step 5.
We’ve updated the instructions to make that clearer, since it’s easy to think something has gone wrong when comparing an unfinished butterfly to the finished photo. If your shape still looks different after tightening the ring, let us know and we’ll be happy to help figure it out!
I followed your sequence of stitches, and it still doesn’t work. Do you have a video tutorial that illustrates the steps? The pictures you have posted do not match the steps to what I come up with. Thank you in advance.
Thanks so much for your feedback! Unfortunately, we don’t have a video tutorial for this pattern yet. Before tightening the magic ring, the butterfly usually looks quite different from the finished result, which can definitely be confusing.
We’ve noted your feedback and have made the instructions clearer. If you can let us know which step starts looking different for you, we’d be happy to help troubleshoot! 🩷