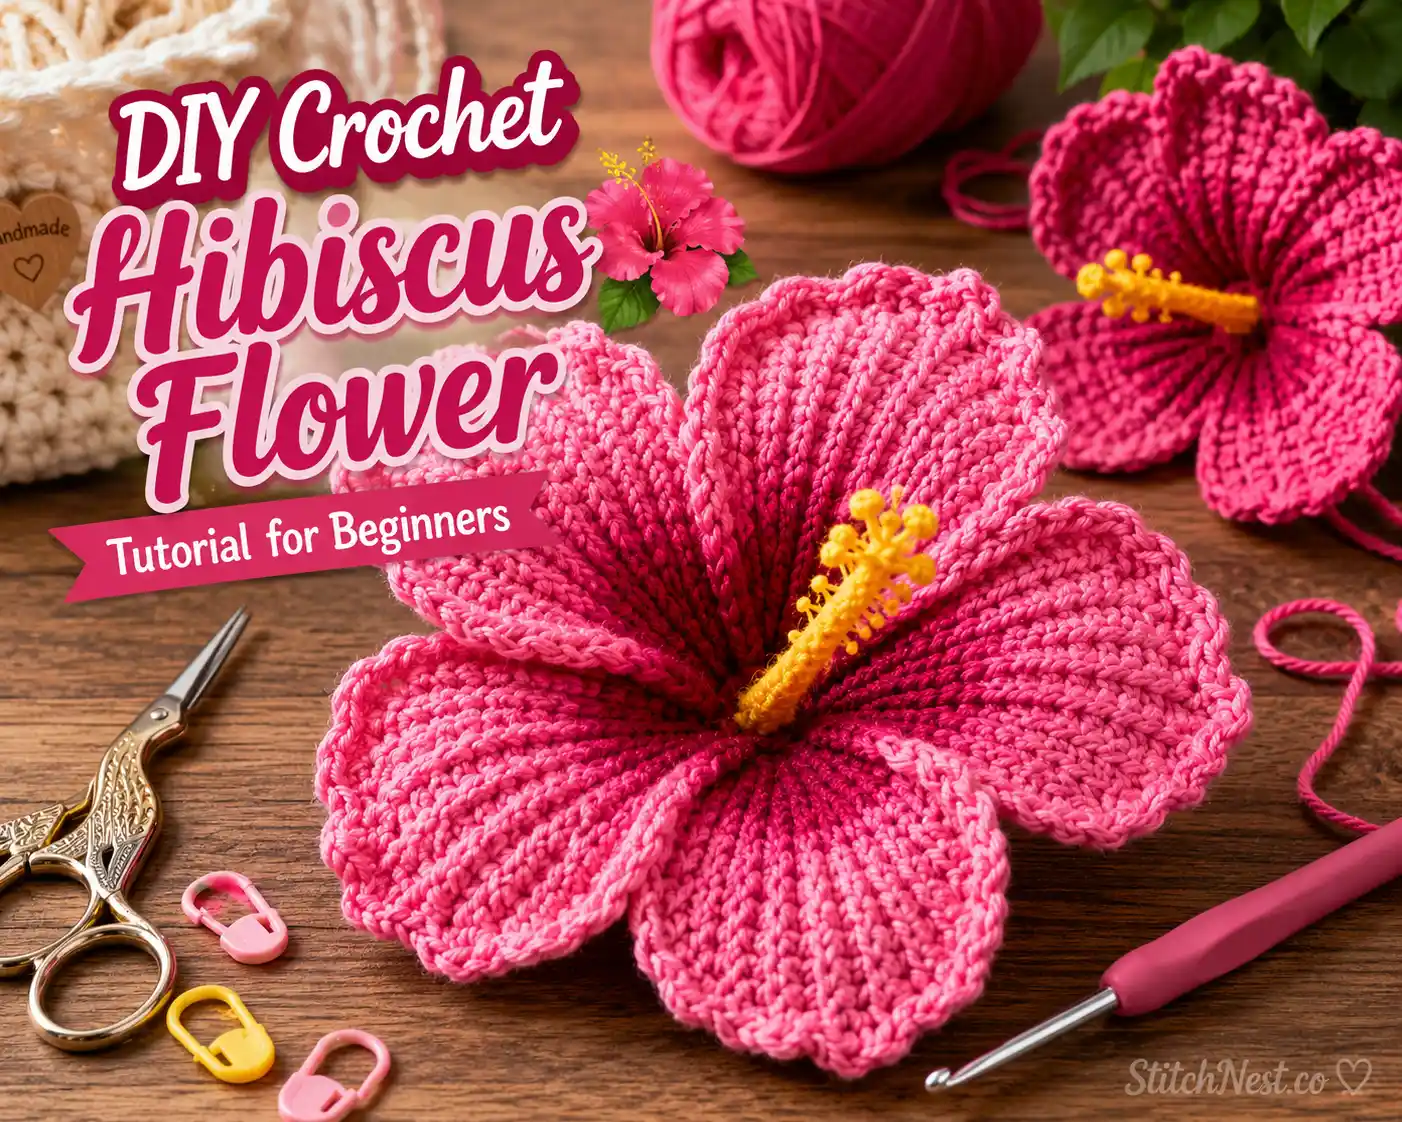
If you’ve been looking for a crochet flower that actually resembles the real thing, a hibiscus is a wonderful place to start. Its large petals and distinctive center make it one of the easiest flowers to recognize. The best part is that once you understand the construction, you can use the same flower on bags, hats, hair accessories, slippers, wreaths, and countless other projects. Follow along step by step, and by the end, you’ll have a beautiful six-petal DIY crochet hibiscus flower!
Turn Your DIY Crochet Hibiscus Flower Into Something You’ll Actually Use
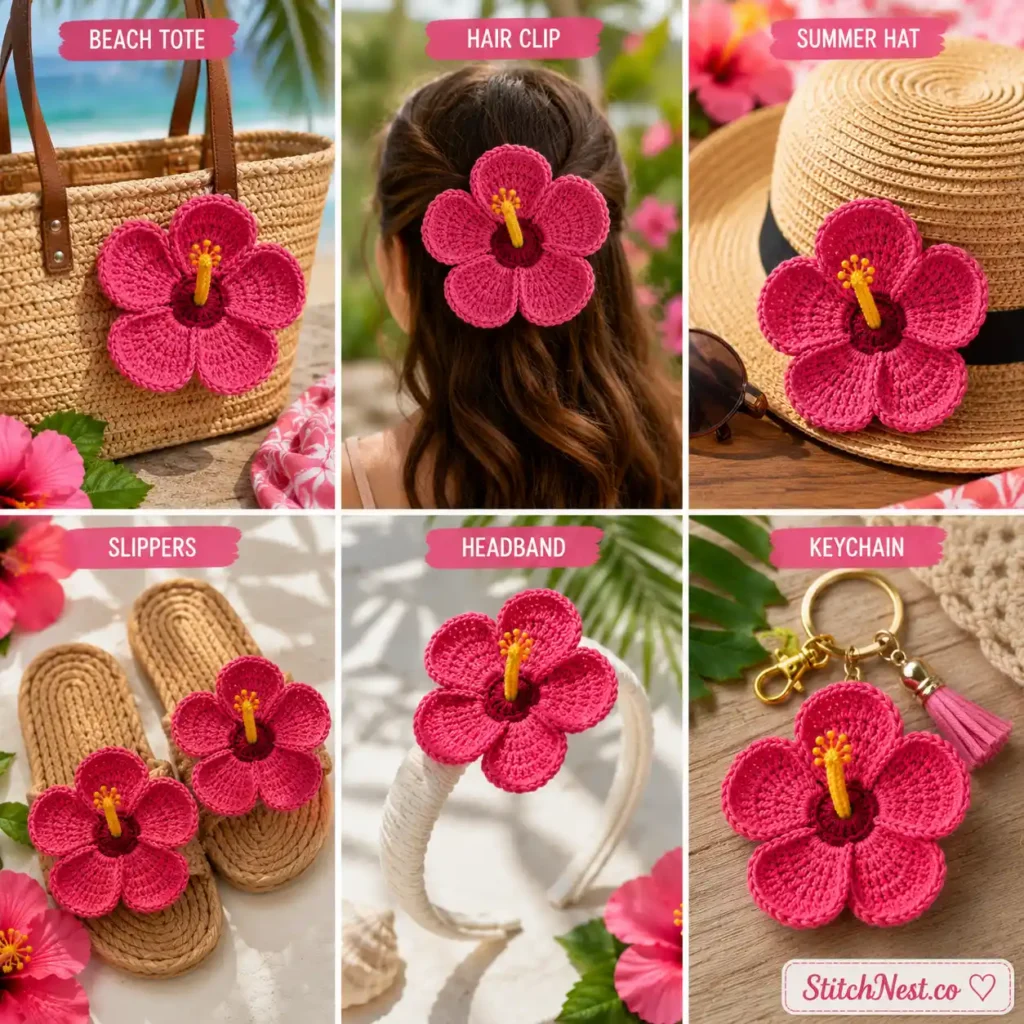
One finished hibiscus flower can become far more than a decoration. Stitch it onto a beach tote, attach it to a hair clip, sew it onto a bucket hat, add it to a wreath, turn it into a keychain, or use it to dress up a simple headband. They also look beautiful on crochet slippers and summer bags.
Once you’ve made one flower, you’ll probably start looking for places to use it. They look especially nice on seashell bags, summer hats, and even cozy house slippers.
Things You’ll Need
- Fine cotton yarn in multiple colors
- Lightweight earring hooks and jump rings
- Steel crochet hooks in small sizes
- Yarn needle for weaving in ends
- Small embroidery scissors
Before You Start: Stitches You’ll Use
This flower uses only a handful of basic stitches. New to crochet patterns? You may also find our How to Read Crochet Patterns for Beginners guide helpful before you get started.
- MR = Magic Ring
- Ch = Chain
- Sl St = Slip Stitch
- Sc = Single Crochet
- Hdc = Half Double Crochet
- Dc = Double Crochet
- Tr = Treble Crochet
If some of these abbreviations still feel unfamiliar, our crochet abbreviations cheat sheet will help you read the pattern more comfortably.
DIY Crochet Hibiscus Flower Tutorial Easy
Step 1: Create the Center of the Flower
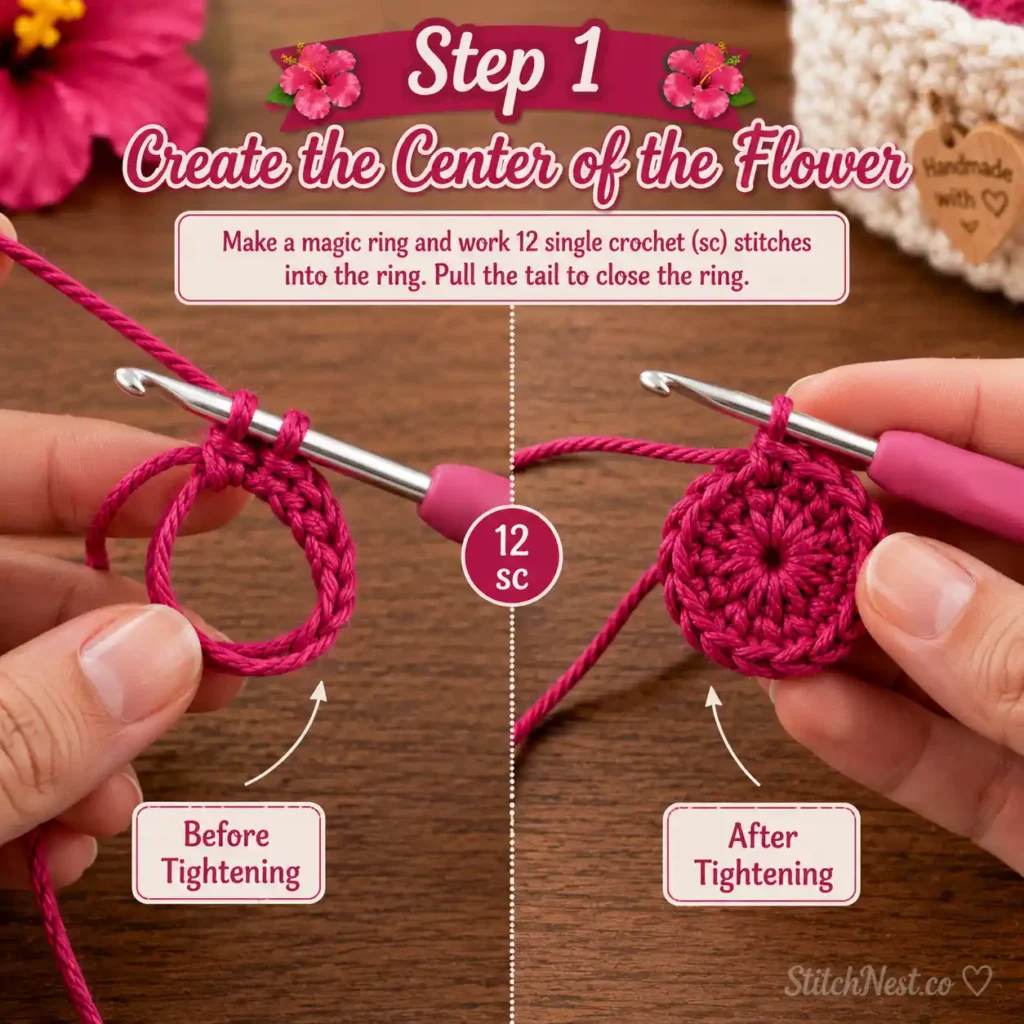
Using your center color yarn, create a magic ring.
Chain 1, then work 12 single crochet stitches directly into the ring.
Once all 12 stitches are complete, pull the tail firmly to close the center. Join with a slip stitch into the first single crochet.
At this point, you should have a small circular center with no visible hole in the middle.
If you’re still getting comfortable with crochet basics, our Beginner’s Guide to Crochet Hooks and How to Hold Crochet Yarn and Maintain Even Tension can make the process much easier.
Take a moment to look at your work before moving on. The center should lie fairly flat. If it curls into a bowl shape, your stitches are probably too tight. If it looks wavy or loose, your tension may be too relaxed.
A lot of beginners rush through this part because the flower doesn’t look exciting yet. Don’t. The center is the foundation for everything that follows. A neat center usually leads to a much cleaner-looking flower.
What Your Work Should Look Like
You should see one small circle with 12 stitches around the edge and no visible hole in the center. The piece should lie fairly flat rather than curling upward. If you still see a small opening in the middle, tighten the magic ring before moving on because it becomes much more noticeable once the petals are attached.
Step 2: Create the Petal Bases
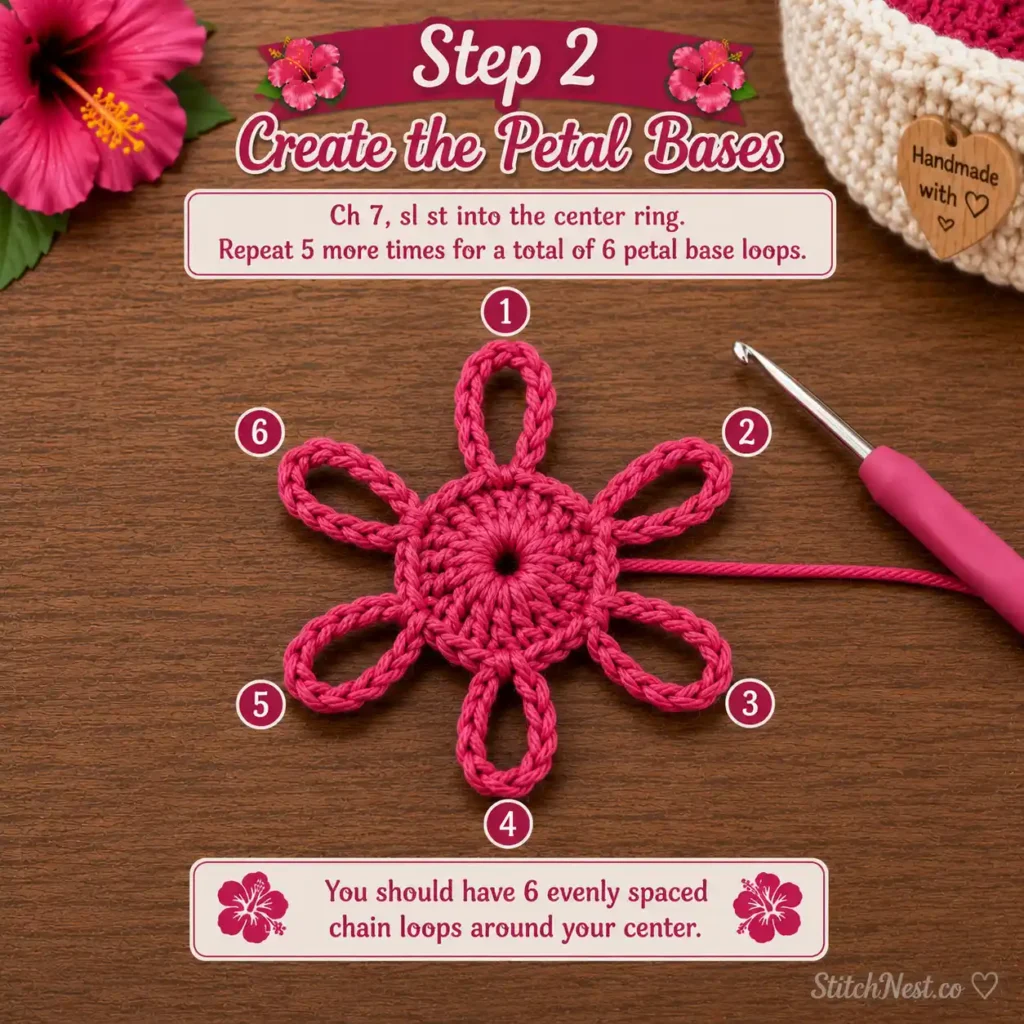
Switch to your petal color.
The goal of this round is not to create petals yet. You’re simply creating six evenly spaced sections that will hold the petals later.
Chain 2.
Into the same stitch, work:
1 Half Double Crochet
Chain 2
Slip stitch into the next stitch.
You’ve just created your first petal base.
Repeat the same sequence around the center circle until you have six petal sections.
As you work around the center, try laying the flower flat on the table every couple of loops. The petal bases should be spaced fairly evenly around the circle. If several loops end up crowded together on one side, it’s worth checking your stitch count now rather than after all six petals are finished.
Take your time counting. Uneven spacing now can make the finished flower look slightly lopsided.
Since the center contains 12 stitches and we’re making 6 petals, each petal base uses two stitches from the center round. Basically, we’re creating six evenly spaced anchor points around the flower. If your loops don’t look evenly distributed, count your center stitches again before continuing.
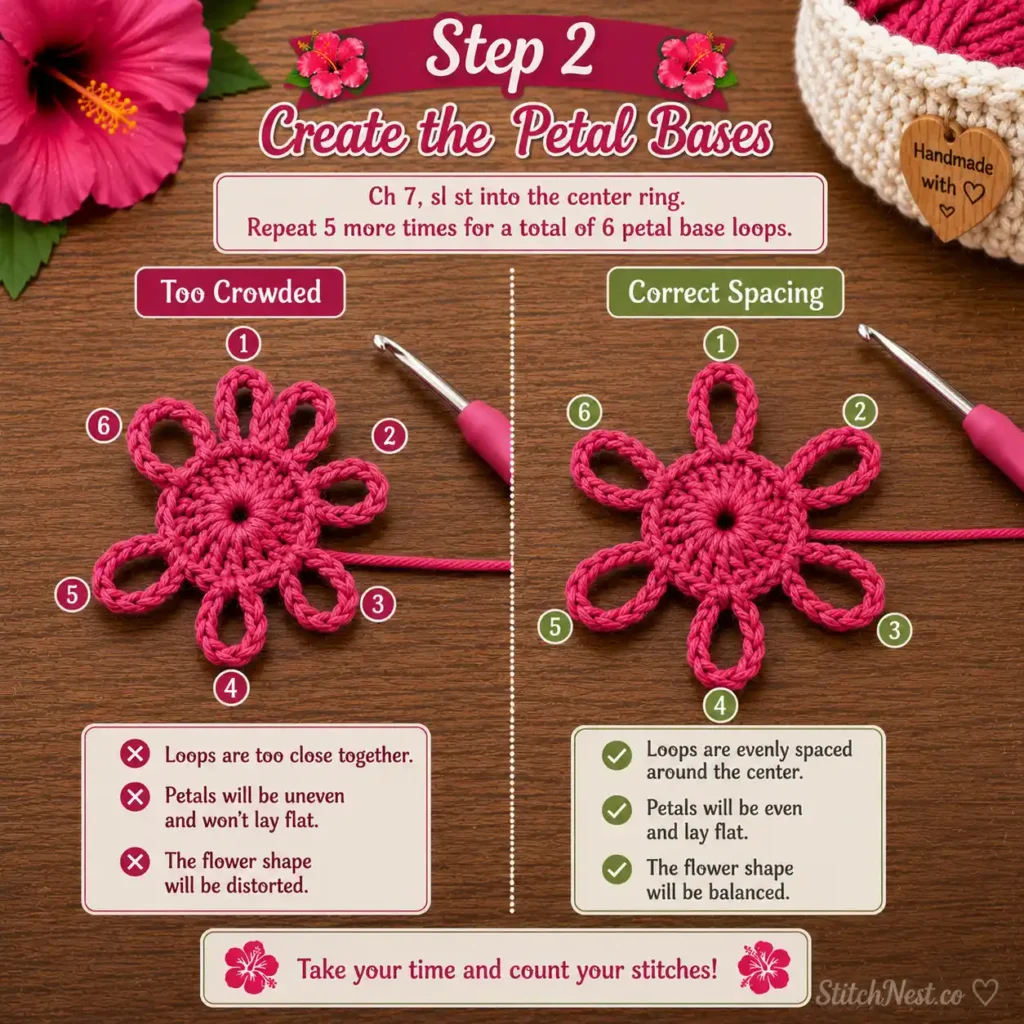
Another quick way to check your work is to count the loops themselves rather than the stitches underneath. Before moving on, you should see exactly six petal loops around the center. If you count five or seven, go back now because it’s much easier to fix before the petals are added.
What Your Work Should Look Like
The flower will probably resemble a small wheel with six loops around the center. Don’t worry if it doesn’t look much like a hibiscus yet. Right now, you’re building the framework that will support the petals in the next round.
Step 3: Build the First Petal
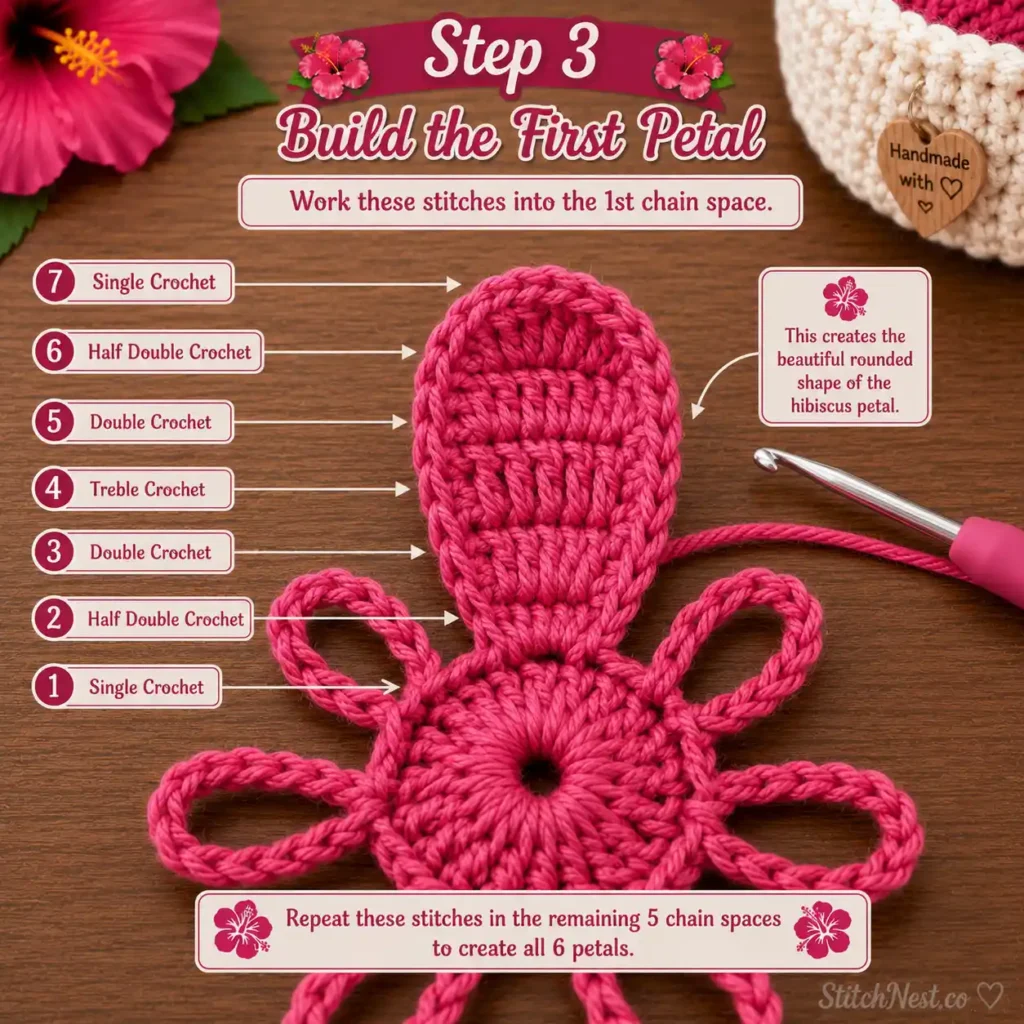
Now the fun begins.
Work directly into the first petal space. Make sure you’re working into the chain space itself rather than into the individual stitches below it. The entire petal should be built inside that loop.
Crochet:
1 Single Crochet
1 Half Double Crochet
2 Double Crochet
1 Treble Crochet
2 Double Crochet
1 Half Double Crochet
1 Single Crochet
Slip stitch into the space between petals. The petal should now have a rounded shape with a slightly taller center.
That treble crochet is important because it gives the petal its characteristic hibiscus curve.
Notice how the stitches gradually increase in height as you work toward the center of the petal, then gradually decrease again on the other side. That’s what creates the rounded hibiscus shape. If you accidentally place the stitches in the wrong order, the petal can look uneven or tilted.
Work the exact same sequence into each of the remaining petal spaces. As you complete each petal, you’ll start seeing the flower appear.
The petals should feel soft and flexible at this stage rather than stiff. If they’re already curling tightly or pulling inward, your tension may be a little too tight.
What Your Work Should Look Like
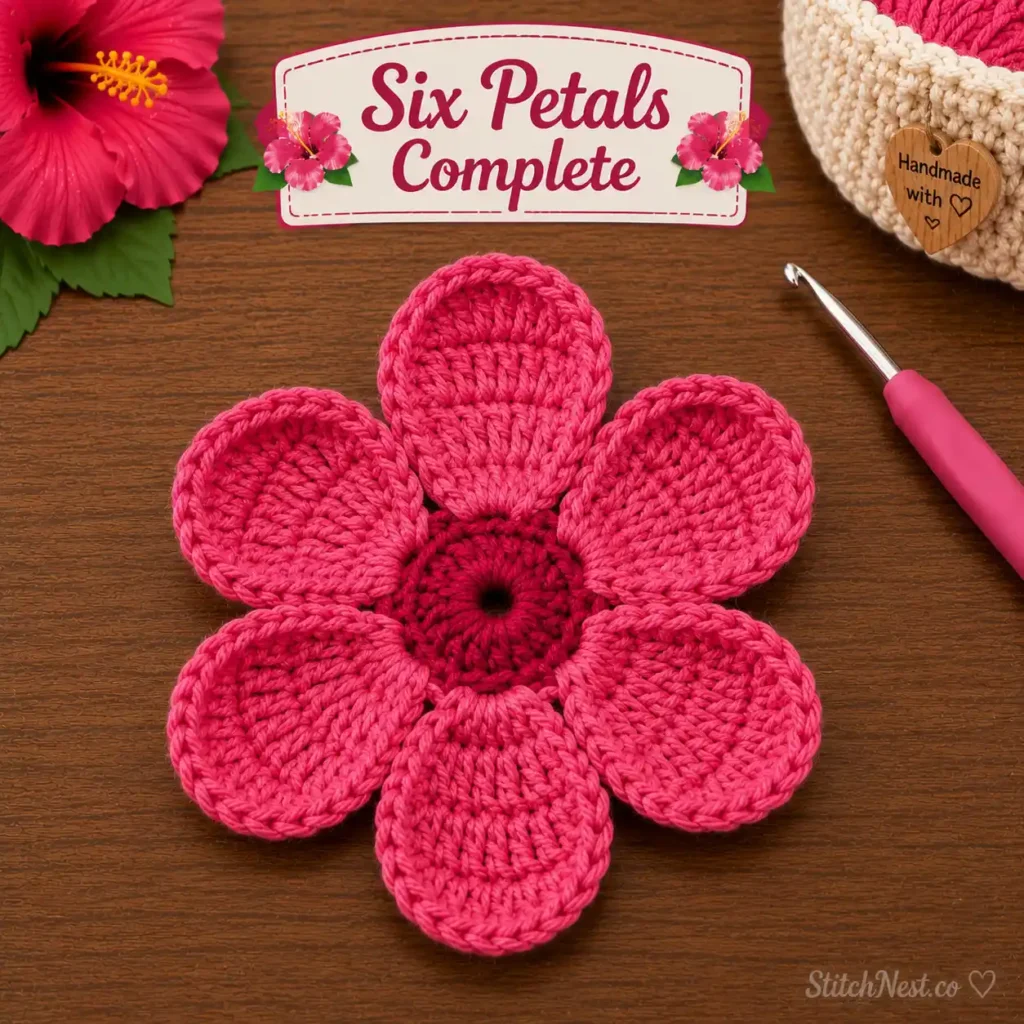
You should now have:
- Six large petals
- A visible flower shape
- Rounded outer edges
- Similar petal sizes
Don’t worry if every petal isn’t perfectly identical. Real hibiscus flowers aren’t perfectly symmetrical either.
Here’s a Tip: Before moving on, spread the petals out with your fingers. This makes it easier to spot any missed stitches or uneven shaping.
Step 4: Add More Shape to the Petals
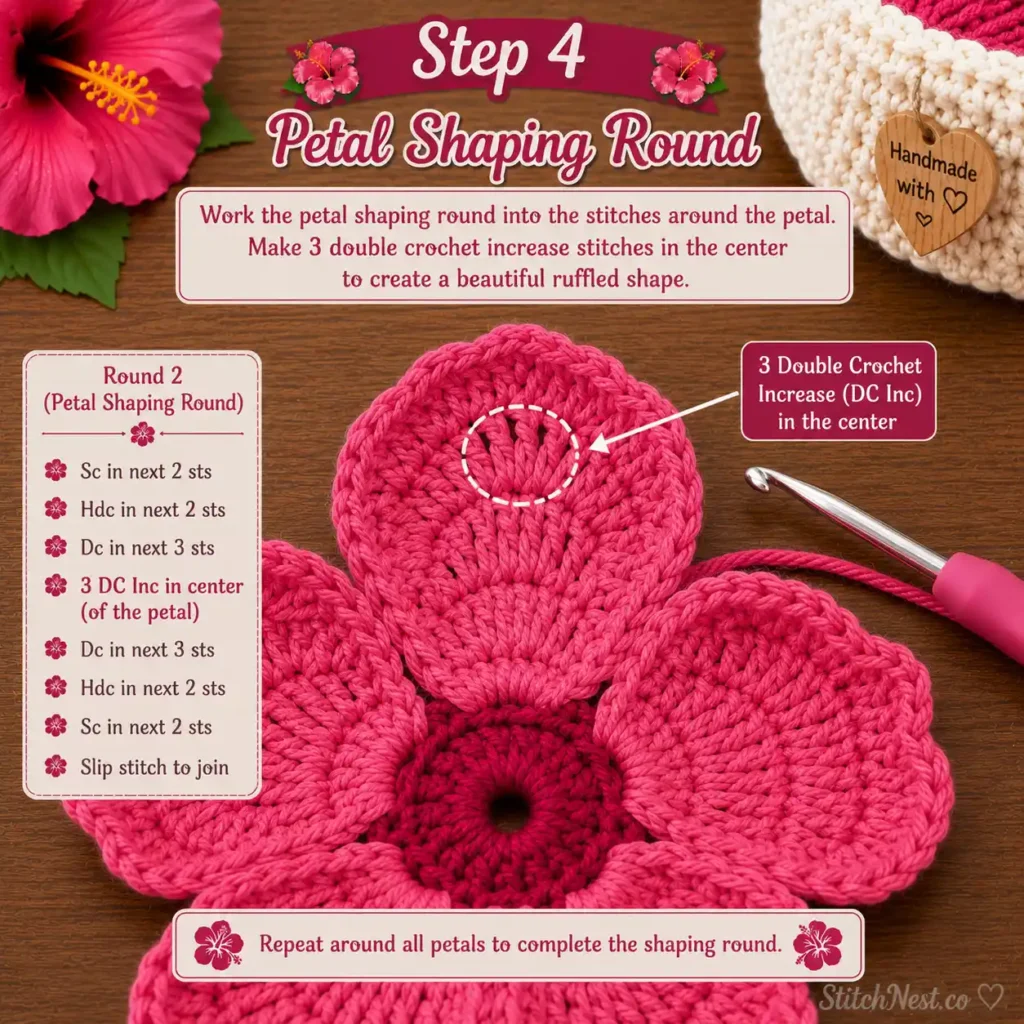
This is the step that separates a flower-shaped coaster from a flower that actually resembles a hibiscus.
Work into the stitches you created in the previous petal round, following the curve of the petal from one side to the other. You’re essentially adding a second layer of shaping around the first petal. Move slowly and make sure the center increase stays at the highest point of the petal.
If you’re unsure where the center of the petal is, gently fold the petal in half with your fingers. The tallest treble crochet from the previous round usually marks the area where your increase should sit.
Working around each petal, crochet:
1 Single Crochet
1 Half Double Crochet
1 Double Crochet
3 Double Crochet in the center stitch
1 Double Crochet
1 Half Double Crochet
1 Single Crochet
Slip stitch between petals.
The additional stitches create a slight ruffle along the edge and add width to the petal. You don’t need to force the petal to lie perfectly flat here. A little movement and gentle waviness along the edge is exactly what gives hibiscus flowers their natural look.
Work carefully and avoid pulling your stitches too tight. Tight stitches can cause the petals to curl inward rather than spreading outward naturally.
What Your Work Should Look Like
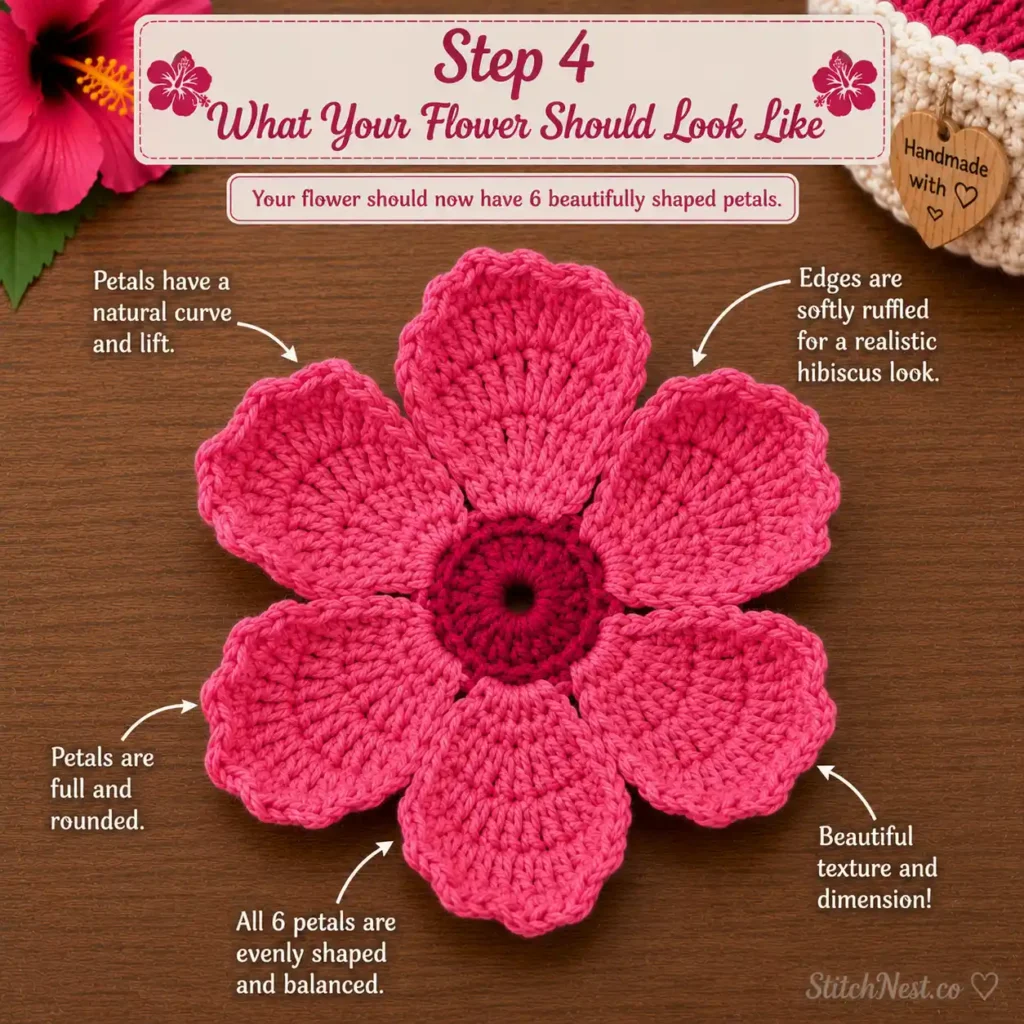
Hold the flower at arm’s length for a moment. You should be able to clearly see six separate petals with a gentle curve around the outer edge. If one petal looks noticeably smaller or flatter than the others, now is the easiest time to fix it.
You may notice slight rippling around the edges. That’s actually a good thing because real hibiscus petals aren’t perfectly flat.
Beginner Mistake: People accidentally place their increase stitches in the wrong spot. Make sure the three double crochets are worked into the center of the petal rather than near the edge.
How Long Should This Take
If this is your first crochet flower, reaching this point may take anywhere from 30 minutes to an hour. That’s completely normal. As you become more familiar with flower construction, you’ll be surprised how quickly these flowers come together.
Step 5: Create the Hibiscus Stamen
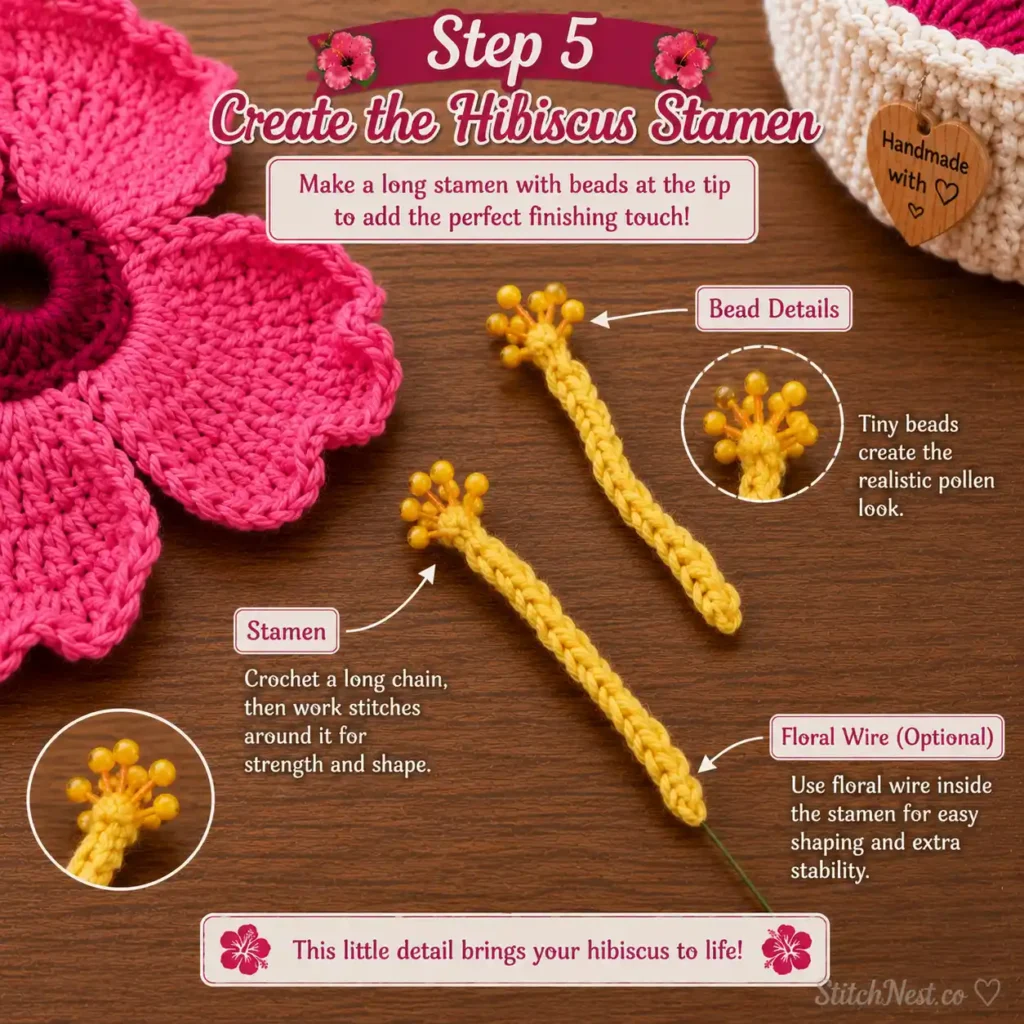
The stamen is what makes a hibiscus instantly recognizable.
Using yellow yarn:
Chain 20–25.
Starting in the second chain from the hook, work a slip stitch into each chain all the way back down.
Slip stitches naturally tighten up more than most crochet stitches. Don’t worry if the stamen twists slightly as you work. That’s completely normal and often adds to the realistic look.
This creates a narrow, firm strand.
For extra realism, attach tiny beads near the top or create several French knots with yarn. Keep those details clustered near the tip of the stamen rather than spreading them along the entire length. That’s much closer to how a real hibiscus looks.
If you want the stamen to hold its shape permanently, thread a thin piece of floral wire through the center before securing it.
What Your Work Should Look Like
The stamen should be:
- Long and narrow
- Slightly stiff
- Longer than the petals
- Visible above the flower
It’s a small detail, but it’s often the thing that makes people immediately recognize the flower as a hibiscus.
Step 6: Attach the Stamen

Thread the stamen through the center of the flower.
Position it so roughly one-third extends beyond the petals.
Secure it firmly on the back using the yarn tails.
Take your time here. A loose stamen tends to shift later and can make the flower look uneven.
Once secured, gently adjust the angle until it resembles the center of a real hibiscus.
Step 7: Shape the Petals
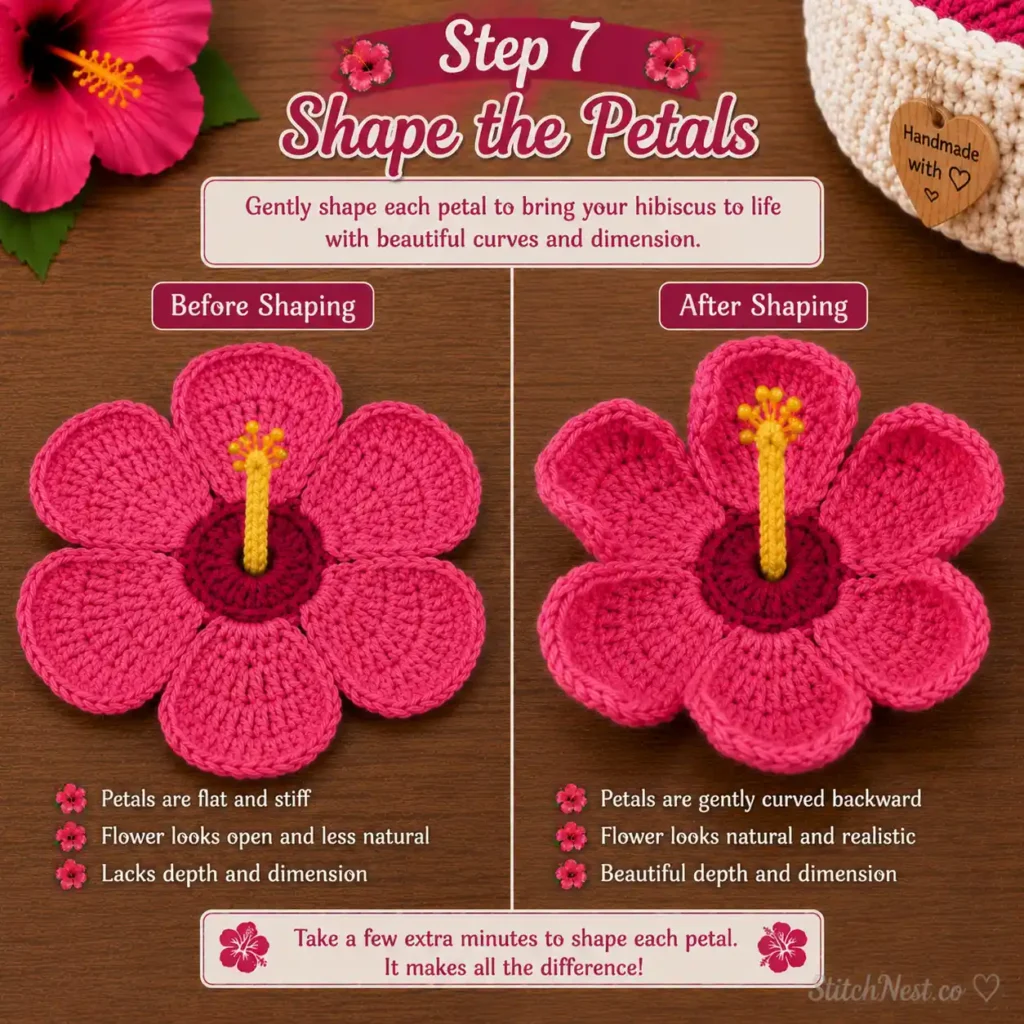
This step is often skipped, but it makes a huge difference.
Using your fingers, gently curve each petal backward.
If you’d like even more dimension, gently pinch the base of each petal toward the center while shaping. This creates a slight cupped effect that looks much closer to a real hibiscus bloom.
Don’t fold them sharply. You’re simply encouraging them into a natural shape.
If you’re using cotton yarn, lightly mist the flower with water and shape the petals while damp.
Allow the flower to dry completely. You’ll be amazed at how much more realistic it looks after shaping.
Real hibiscus flowers rarely sit perfectly flat. Some petals naturally overlap, and the edges often curve backward slightly. Try lifting one or two petals a little higher than the others instead of arranging them perfectly evenly. Small variations like these usually make the flower look much more realistic.
One more time, hold the flower at arm’s length when you’re finished shaping. From that distance, you should clearly see a raised center, six distinct petals, and a stamen that extends beyond the flower. If those three features stand out immediately, you’re on the right track.
Step 8: Finish and Secure
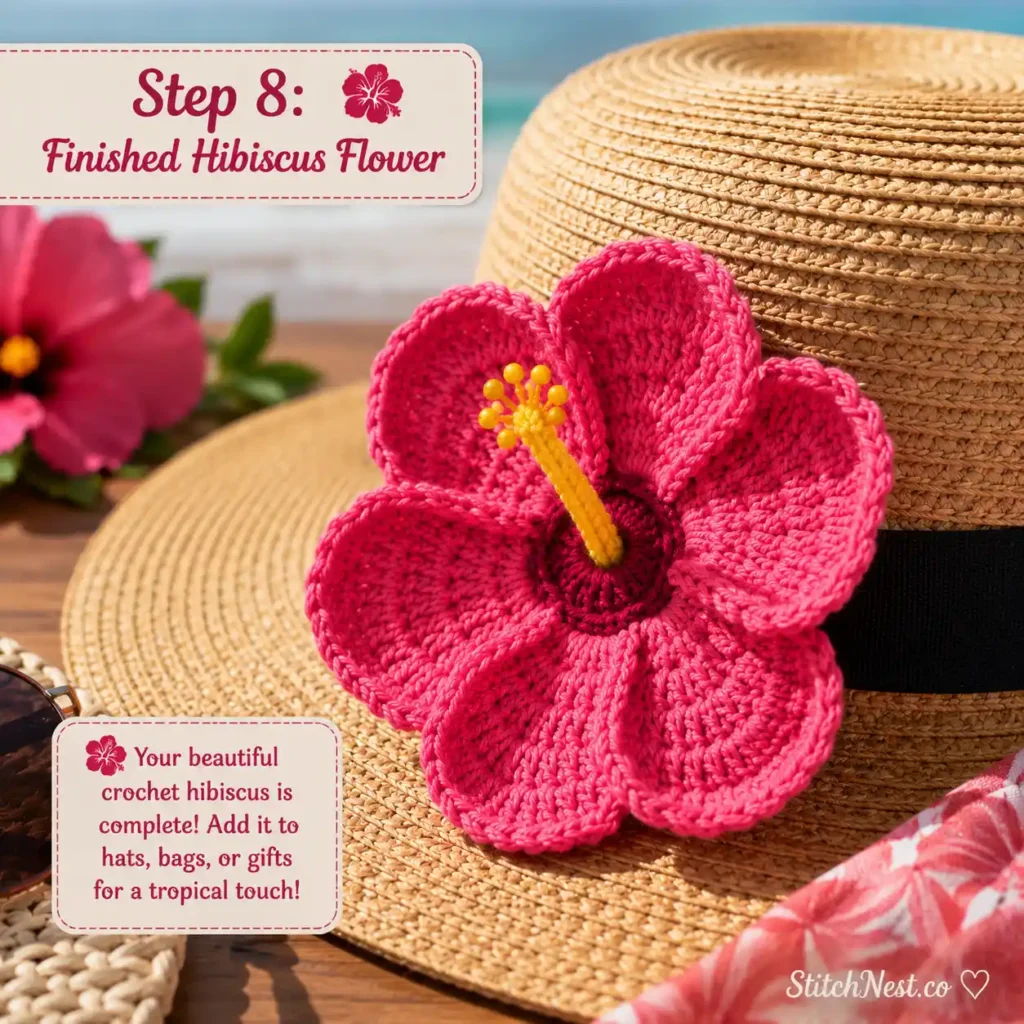
Weave in all remaining yarn tails carefully.
Trim excess yarn.
Check the back of the flower for loose ends.
If the flower will be attached to a bag, hat, or headband, now is the perfect time to sew it in place.
Your hibiscus flower is now complete.
Quick Stitch Sequence Reference
Center:
MR, Ch 1, 12 Sc, Sl St
Petal Bases:
Ch 2, Hdc, Ch 2, Sl St
Repeat 6 times
Petals:
Sc, Hdc, 2 Dc, Tr, 2 Dc, Hdc, Sc
Repeat 6 times
Petal Shaping Round:
Sc, Hdc, Dc, 3 Dc, Dc, Hdc, Sc
Repeat 6 times
Stamen:
Ch 20–25, Sl St back down chain
How to Make Your Hibiscus Look More Realistic
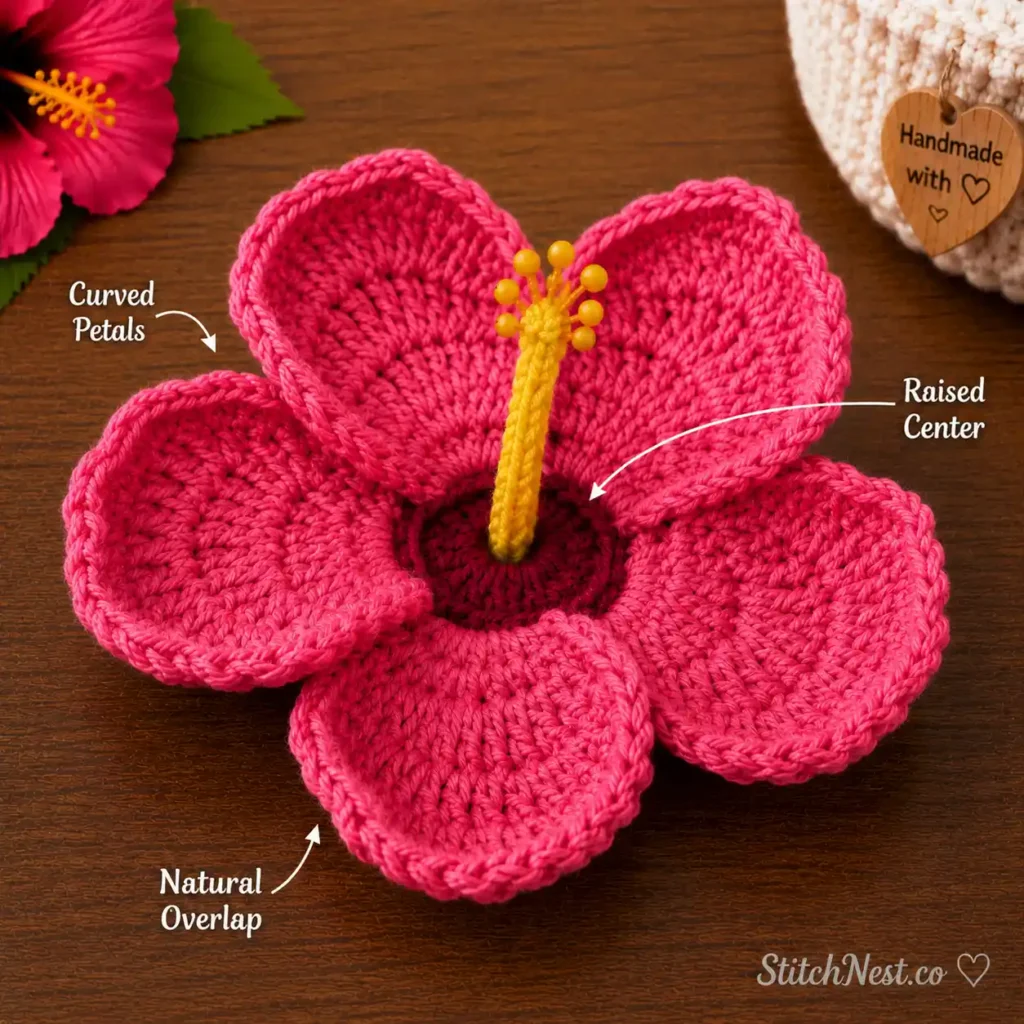
Use a darker center color than your petals. Real hibiscus flowers often have a noticeable color transition near the center.
If you’re choosing colors, look at real hibiscus photos before starting. Most varieties have a darker center that gradually fades into brighter outer petals. Using two shades of the same color can help recreate that effect without making the project more complicated.
Choose cotton yarn whenever possible because it holds shape beautifully and highlights stitch definition. Gently curl the petals backward rather than leaving them completely flat.
You can also overlap neighboring petals slightly when attaching the flower to a project. Real hibiscus flowers often have petals that sit on top of each other rather than spreading out like a perfect circle.
If you enjoy making decorative crochet pieces, our DIY Crochet Dragonfly Tutorial is a fun project to try next.
Make the stamen slightly longer than you think it needs to be. The extended center is one of the most recognizable features of a hibiscus.
Adding one or two crochet leaves behind the flower can also make the entire piece look more complete.
Don’t worry if every petal curves a little differently. Real hibiscus flowers rarely have six perfectly matching petals. Slight variations often make the finished flower look more natural.
Before attaching the stamen permanently, place it on top of the flower and step back for a quick look. If it’s too short, the flower can lose that classic hibiscus appearance. It’s usually better to leave it slightly longer than you think you need.
Troubleshooting Guide
- If the petals curl excessively, your tension is likely too tight.
- The flower feels floppy? Try using a smaller hook, a firmer cotton yarn, or lightly blocking the petals after shaping.
- If the center puckers, double-check that the magic ring was fully closed.
- If one petal looks noticeably larger than the others, count the stitches and compare them to the neighboring petals before continuing.
- And if all six petals seem to curl inward, try reshaping them while they are lightly damp. Cotton yarn responds especially well to this technique.
Common Mistakes to Avoid
The biggest mistake is rushing through the flower because the early rounds seem simple. Take your time with the petal bases and count carefully, since uneven spacing can affect the entire shape later. You should also avoid pulling your stitches too tightly, especially around the petals, because that can make the flower curl more than intended. If the center still has a visible hole, go back and tighten the magic ring before moving forward.
Plus, don’t skip shaping the petals and attaching the stamen properly. Those two details do more than anything else to make the finished flower look like a real hibiscus instead of a basic crochet flower.
Small crochet embellishments are surprisingly addictive to make. Once you’ve finished a hibiscus, you might also enjoy creating a few DIY Crochet Hearts for gifts, keychains, and decorative projects.
A DIY crochet hibiscus flower is one of those projects that looks impressive but comes together surprisingly quickly once you understand the construction. After making your first one, you’ll probably find yourself experimenting with different colors, yarns, and sizes.
Save this tutorial for later, make a few extras for future projects, and don’t be surprised if these flowers start showing up on everything from bags to hats to handmade gifts. If you enjoyed this project, our DIY Crochet Butterfly Tutorial is another fun way to practice shaping and decorative crochet techniques.